TDSTV ® USER GUIDE 150468/7-13/8213 August 2013
Contents Introduction................................................................................................................................................................. 5 Your Equipment........................................................................................................................................................... 5 Watching TDS TV............................................................................................................................................
Viewing a List of Scheduled Series Recordings.................................................................................................... 30 Canceling Scheduled Recordings...................................................................................................................... 31 Canceling a Single or Series Recording from the Program Guide.................................................................. 31 Canceling a Single Recording from the Recorded TV Screen..................
Using Personal Media with a USB Storage Device................................................................................................ 48 Remote Control Keys.......................................................................................................................................... 49 Advanced Local Weather Application................................................................................................................ 49 Using Parental Locking Controls........................
Introduction As a TDS TV customer, you’re at the forefront of the next generation of TV services. Powered by Microsoft® Mediaroom®, TDS TV delivers not only the best programming, but the most advanced technology, too. The result is: TV on your terms, plus home networking capabilties that enable your computers and TVs to be one. TDS is committed to customer satisfaction. So, if you ever encounter issues or have questions about TDS TV, please call 1-866-44-TDSTV (448-3788).
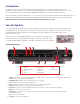
CISCO ISB7050 (Back) 1 2 3 1. To Wall (Video In) 2. To TV (Video Out) 3. Network 4 5 6 7 4. eSATA Port 5. Component 6. S-Video 8 9 10 7. Video Out 8. Audio Out (L/R) 9. Optical 11 12 10. HDMI 11. USB Port 12. Power 1. To Wall (Video In) – Connects the set-top to in-house coaxial wiring, if applicable. (optional) 2. To TV (Video Out) – Connects to TV. You must set the channel on your TV to the channel designated by TDS (3 is default). To change this, go to the Menu and scroll to Settings.
1. Power – Turns on the set-top box/DVR or places it in standby mode. To restart the set-top box/DVR, press and hold the POWER button for 10 seconds. The LED is green. 2. Model Number – Identifies the model number of your set-top box. 3. Signal Strength —Indicates the strength of the wireless signal from the wireless access point (WAP) to the set-top box. If five lights appear green, the signal is excellent. If not lights appear, no wireless connection is detected.
VEN501 WIRELESS ACCESS POINT (FRONT) 1. Signal 2. Power 3. WPS 4. Paired 5. Link 1 2 3 1. Signal – Indicates the strength of wireless signal. 2. Power – Indicates the power is on (light glows green). 3. WPS – Pairs the wireless access point (WAP) with a wireless set-top box. 4 4. Paired – Glows solid green to indicated at least one wireless set-top box is paired. Blinks orange when a pairing is in progress. Flashes green to indicated wireless activity is detected. 5.
Watching TDS TV Turning on Your TV Your set-top box, network hardware, and TV should be connected and plugged in. The POWER button is green when your set-top box is turned on. The LINK light on your set-top box should be solid green, indicating the set-top box is connected to the network. If the LINK light is not solid green, please check that all wires between the set-top box and residential gateway are secure. And, make sure the Internet light on the gateway is green.
CISCO Remote Control: Quick Reference 1 Device Control: Power on/off for devices programmed to work with remote 2 DVR, VOD, DVD, VCR Control: Control recording and DVR functions Advance by day through the Guide DVR jump forward or back Access Video-OnDemand Store 3 Viewing and Browsing Control Control recording and DVR functions Access DVR recordings Access TDS TV features Program description and original air date 4 Volume Control Access Interactive Guide Displays last 5 channels viewed 5 Numeric
TDS Remote Control: Quick Reference 1 Device Control: Power on/off for devices programmed to work with remote 2 Access Interactive Guide Advance by day through the Guide Viewing and Browsing Control Control recording and DVR functions Access On Demand Store Access TDS TV features Advance by day through the Guide Program description and original air date Displays last 5 channels viewed 5 Volume Control Access DVR recordings 3 4 DVR, VOD, DVD, VCR Control: Control recording and DVR functions Nume
Programming Your CISCO Remote Control The Universal Remote Control provided with your TDS TV set-top box can be programmed to operate other devices such as your TV, DVD, Home Theater System, or VCR. Automatic Search for TV and DVD Codes 1. Turn on the device you want to assign to the TV or DVD button. 2. Point the remote at the device. 3. While pressing and holding a selected mode button (TV or DVD), press the OK button. For example, to search for a TV code, press and hold TV and OK at the same time. 4.
Resetting the Cisco Remote to Factory Default Settings (Program Code 900) 1. Press and hold the STB mode button on the remote. 2. Without releasing the STB button, press and hold the OK key. 3. Release both buttons and all mode keys blink twice. 4. Enter the programming code 9 0 0 by pressing the numeric buttons on the remote control. The STB mode key blinks four times to indicate you have successfully reset the remote to factory default settings.
Seeing What Else Is On Without Changing Channels While watching full-screen TV, use the arrow buttons under BROWSE on your remote control to see what is playing on other channels without leaving the show you are watching. Here’s how: 1. Press any arrow button on your remote control to display the browse panel. It will appear at the bottom of your screen while your TV remains tuned to the program you are watching. 2.
2. Press the UP ARROW or DOWN ARROW button to step through the previous five channels you visited. If you’ve tuned to less than five channels, only the channels you’ve visited appear in the recent channel panel. If you’ve tuned to a channel more than once it appears as a single entry. 3. Press the OK button to tune to the program highlighted in the recent panel. 4. Press the EXIT TO TV button to close the recent channel panel.
Using Categories Within the Live TV submenu you’ll find the Categories option. Categories is an alternative guide view, which groups channels by genre (local, movies, sports, news, etc.) To access Categories, do this: 1. Press the MENU button on your remote control. The menu screen appears. 2. Select the “Live TV” submenu. 3. Use the DOWN ARROW button to highlight Categories and press OK. The Categories screen appears.
Using the Program Info Screen Learn more information about a selected program or perform various actions related to a program, such as renting or watching it. To display more information about a program while you’re viewing the program guide: 1. Use your remote control’s arrow buttons to select the program on the Guide screen. 2. Press the INFO button on the remote control. The info screen will appear. To display more information about a program you are watching in full-screen mode: 1.
Controlling Live (Real-Time) TV With TDS TV, you can control live TV programming: pause, rewind, and fast-forward. Here’s how: 1. Press the PAUSE button on your remote control to freeze your current program for up to 90 minutes. You’ll see the frozen program, along with an indicator, which displays: • The paused time (shown as a vertical line with the time below it). • And the amount of time elapsed since you paused the program (shown as the shaded area after pause time).
Jump to HD If you are tuned to an SD channel and there is an HD channel available, a message appears along the bottom bar in yellow that states “Press Ok to tune to the program in HD”. Recording TV Programs With a TDS TV Connected-Home DVR, you can watch TV when it’s convenient for you! Schedule your favorite shows and movies to record and replay them whenever you want. Pause live TV so you don’t miss a moment of your favorite show and fast-forward and rewind to move frame by frame.
Here’s how to close a recording after it finishes playing: 1. Use the arrow buttons on your remote control to select Recorded TV on the Finished screen. Then, press the OK button. 2. The Recorded TV screen appears and displays a list of your recordings. For more information, see Watching a Recorded Program. 3. Use the arrow buttons on your remote control to select Watch Live TV on the Finished screen. Then, press the OK button.
Record a Single Program Using the Program Guide Use the program guide to record a program that’s currently showing or to schedule a recording for a future program. You can record programs until their scheduled end or add extra time to the recording. This can be done from any set-top box in your home. To record a program until its scheduled end: 1. Press GUIDE on your remote control. Then, use the arrow buttons to move through the listings to a program that you want to record. 2.
6. When you are finished customizing your settings, select Record and press the OK button on your remote control. To change how long the recording will be stored do this: a) Select the text under KEEP UNTIL and press the OK button on your remote control. The Record Episode: KEEP UNTIL screen appears: Select one of the following options and press OK: • Keep until space needed: Erase the program automatically when space is needed for a new recording.
7. When you are satisfied with your settings, select Record at the top of the screen. Then, press the OK button on your remote control to make the recording. Note: Select Don’t Record to exit from the screen without scheduling a recording. Recording a Series You can record recurring programs, such as episodes in a series. Once scheduled, a series recording occurs as long as the series is broadcast. You can view and make recordings from any set-top box in your home.
b) To change the type of shows that are recorded, use the arrow buttons to select the text under SHOW TYPE: • First run & rerun. Record first-run episodes and all subsequent reruns of this program. • First run only. Record first-run episodes, no reruns. Once you’ve made your selection, press OK.
4. Press the OK or INFO button. Select Series Info and press OK. The Series info screen appears. 5. On the Series info screen, select Change settings, and press the OK button. The Series settings screen appears. 6. Make changes as outlined in Recording a Series from the Program Info Screen. 7. Select Save changes, and then press OK. The series is recorded with your new settings. Changing the Series Priority Sometimes, conflicts may occur if you schedule multiple series to record.
Resolving Recording Conflicts Resolving Conflicts for a Single Recording When an individual recording conflicts with one or more scheduled recordings, a recording conflict screen alerts you to the problem. The recording conflict screen includes at least one recording conflict icon (the crossed-out red dot) next to a program name. This icon notifies you the program had been scheduled, but will not actually be recorded.
Resolving Conflicts for a Series Recording When episodes of a series conflict with previously scheduled recordings, a recording conflict screen enables you to choose how to resolve the conflict. To record all episodes of the series and cancel conflicting recordings, do this: • Select record all episodes of Series conflict: Series name, and then press the OK button. The recordings of episodes for the new series override and cancel any previously scheduled recordings.
3. Select Resolve conflict with the ARROW buttons on your remote control, and press OK. You’ll see the Recording conflict screen listing the conflicting recordings. Use the ARROW buttons on your remote control to select the program you want to record, and then press the OK button. The program or programs scheduled to be recorded will be marked with a red dot. When you select one program to record, the program or programs beneath it will have their red dots removed. 4.
2. Select Resolve conflict. Then, press OK. A Scheduling conflict screen appears. 3. Select the previously overridden program. Then, press OK. The overridden program, which now overrides the previous conflict winner, will be recorded. Here’s how to clear the conflict icon for an individual recording: 1. Select the overridden program in the program guide. Then, press the OK button on your remote control. A Program info screen appears. 2. Select Don’t Record, and then press OK.
Viewing a List of All Scheduled Recordings A list of the individual programs and series episodes which are scheduled to be recorded will appear on all set-top boxes in your home. Here’s how to see a list of all scheduled recordings. 1. Press the RECORDED TV button on your remote control. The Recorded TV screen appears. 2. Use the RIGHT ARROW button to select Scheduled on the horizontal menu bar.
3. Use the ARROW buttons or the CHANNEL/PAGE button on your remote control to scroll through the list. Here’s how you can view a list of upcoming recordings for a particular series: 1. Press the RECORDED TV button on the set-top box remote control. 2. Press the RIGHT ARROW to select Series. 3. Select the desired series in the Recorded TV screen, and then press OK. The Series info screen appears. 4. Press the LEFT ARROW button to select Scheduled on the horizontal menu bar.
Canceling a Single Recording from the Recorded TV Screen You can cancel an individual recording after selecting it in the Recorded TV screen. To cancel a scheduled individual recording, do this: 1. Press the RECORDED TV button on the remote control. The Recorded TV screen appears. 2. Use the RIGHT ARROW button to select Scheduled on the horizontal menu bar.
Viewing a List of Recorded Programs Here’s how you can view a list of recorded programs: • To view a list of the programs you have recorded, press the RECORDED TV button on your remote control. The Recorded TV screen lists your available recordings by date. To view the list by title, select By title in the horizontal menu bar. • When the recording has been viewed, the program name on the list becomes italicized and gray.
2. Select the recorded show you want to watch, and then press the OK button. The Program info screen appears. 3. In the Program info screen: • Select Play to play the recording from the beginning. Note: If the recorded program is locked by parental locking, the Lock screen appears. To unlock the program, press OK, enter your PIN, select Unlock this Program, and then press OK. The program automatically relocks after 4 hours. For more information, see Watching a Locked Program.
DVR Free Space App The TDS TV DVR Free Space application is a quick and simple way to view the amount of recording space available on your Whole-Home DVR system. This application can be accessed by any set-top box that you have connected to the system in your home. 1. Press the MENU button on your remote control. 2. Use the RIGHT ARROW key to navigate to the Recorded TV Menu. 3. Use the DOWN ARROW key to highlight DVR Free Space and press the OK button.
Erasing Existing Recordings Recorded programs remain in your Recorded TV library until you erase them, or they’re automatically erased to make space for new recordings. You can choose to manually erase a single program or you can erase all the recorded To erase a program manually: 1. Press the RECORDED TV button on your remote control. The Recorded TV screen lists your available recordings by date from most recent to oldest. Series recordings are grouped together.
2. Enter the User Name/E-mail Address and Password associated with your TDS email login. Click Continue. Note: If you have problems logging in, please call 1-866-44-TDSTV. The schedule for TDS TV programming will appear. From this page, you can: 1. Search by Date, Time, or Right Now. 2. Use the Title Search to look for additional programs. 3. Click on the program to display the channel, title, time and date of the program. Viewing a list of HD Programs 1.
2. Make appropriate selections in the drop-down menus. 3. Check the Record the series box. 4. Select Show Type. 5. Click Set Recording. 6. A message confirming your recording has been scheduled will appear. Click exit. Viewing Scheduled Shows 1. Click on the Scheduled Shows tab at the top of the TDS TV Remote DVR window. 2. The programs scheduled to record appear as a list. Note: To cancel recordings from this tab, click the red box next to the appropriate scheduled show.
Renting Videos You can rent movies and other programs, such as a TV series, which are available as videos. Once you rent a video, you can watch it immediately or at any time before the rental period expires. You can start the video, stop it, and resume playing at any time during the rental period set by your service provider. If you subscribe to premium channels like STARZ® or Encore®, additional content is available for On-Demand viewing. This is found in the Video-on-Demand Storefront.
If you have rented any videos, Current rentals is the first category in the My Videos screen. A list of currently rented videos and Recently Watched videos are displayed. When a rental expires, it is deleted automatically from the list. 2. Use the arrow buttons on your remote control to select the video in the list. Then, press the OK button. 3. On the Program info screen for the selection, select Watch, and then press the OK button.
To close a video after it ends, do this: Select one of the following using the arrow buttons on your remote control: • To watch live TV, press Exit to TV. • To view other videos, select Video On Demand. To stop watching a video before it ends, do this: 1. Press the STOP button on your remote control. 2. Select one of the following: • Resume to continue watching the video where you left off. • Start over to start watching the program again from the beginning.
Note: If the program is locked by parental locking, you are prompted to enter your parental PIN before you can rent the program. For more information, see Using Parental Locking (Parental Control). A rental confirmation message appears. 4. To rent the program, select Rent for. Then, press the OK button. (If you don’t want to rent the program, select Don’t rent to close the confirmation message without renting the program.
Note: If the program is locked by parental locking, the Lock screen appears. To unlock the program, press OK, enter your PIN, select Unlock this Program, and then press OK. Controlling a Pay-Per-View Program After you have tuned to a PPV program, you can pause, fast-forward, and rewind it like any other live TV program. For more information, see Controlling Live (Real-Time) TV. Applications On-Screen Caller ID Note: You must be subscribed to a TDS Voice package to use this feature.
3. A list of Voice Mails currently in your mailbox will be displayed. The date and time the messages were left is shown along with the phone number and name of caller. An envelope graphic on the left side of the message indicates whether or not you’ve listened to the message. A closed envelope indicates you haven’t listened to it. An open envelope means you have listened to it. 4.
Configuring Your Microsoft Windows XP/Vista PC To share media with your television, you have to configure your PC by doing this: 1. On your PC, launch Windows Media Player by clicking on the desktop shortcut. 2. Locate the Library button on the Windows Media Player toolbar. 3. Click the Library button. Then, click Media Sharing. The Media Sharing dialog box appears. 4. Select the Share my media to check box. Click the generic device icon labeled Unknown Device. Then, click OK.
The Media Streaming options panel item appears. your Mediaroom device and then click OK. 5. Select Allowed from the drop-down menu for 6. Your PC is now configured to share media with your set-top box. Using Personal Media with your PC To access Personal Media, follow these steps (these steps are only necessary for initial set-up or when selecting different source pc’s): 1. Press MENU on your remote control. Scroll across the top menu bar to TDS Applications. 2. Select Personal Media. 3.
The left panel provides a set of menu categories: • Artist or Album: shows the grid browse view of the music library • Songs, Playlists or Genres: shows the list browse view of the music library • Now Playing: displays the Now Playing screen • Photos: displays photos from your photo library • Sources: allows you to change the source selection (if you have more than one computer networked) Playing Music on Your Television To play music on your television, follow these steps: 1.
2. Select Personal Media. 3. Use the DOWN ARROW to select Photos 4. Use the RIGHT/LEFT arrow buttons on your remote control to highlight an individual image. 5. Press the OK button to display as a slideshow. 6 Press the MENU button on your remote control. 7. Use the DOWN ARROW button on your remote control. Here you can change the sorting function, speed of the slideshow and select background music.
Remote Control Keys The following table lists your remote control keys and how they work with Personal Media. Remote Control Key Photos Only Music Only Photos and Music Play Play Slideshow. Play music. Play photos and music. Pause Pause Slideshow. Pause music. Pause photos and music. Stop Stop slideshow and go back to browsing. Stop music and go back to browsing. Stop photos and music and go back to browsing. Skip Skip to next photo. Skip to next song. Skip to next song.
3. If there is a Severe Weather Alert for your local area, you will be presented with the following notification under the current tab: 4. When the Severe Weather alert icon is flashing, use the Up or Down arrow buttons on your remote to select the Severe Weather icon on your screen. Once selected, press the OK button on your remote. 5. From this screen, you can view details of the severe weather alert.
2) Press the Guide button on the remote and select a different channel 3) Press the Menu button on the remote 4) Press the DVR/Recorded TV button on the remote 2. Once the “X” icon has been selected, you will be presented with the following screen: 3. From here you can use the Channel Up and Channel Down buttons to select a different channel. Viewing weather from other cities within the Weather Application: 1.
A picture of a lock is not shown, it means that no PIN is set and parental locking is not in effect. If a picture of a lock is shown, that means that a PIN is already set and parental locking is in effect. 4. Select Parental locking and press the OK button. 5. Use the number buttons on your remote control to enter a four-digit PIN. When typing the PIN, you can press the DELETE button on your remote control to erase the previously typed digit. 6.
Locking Adult Content To lock or unlock adult content: 1. Open the Parental locking Settings screen and enter your PIN as described in Getting Ready to Use Parental Locking. 2. Use the RIGHT ARROW button on your remote control to select the Change button next to Adult programs and press OK. The Lock adult programs Settings screen appears. 3. Use the RIGHT ARROW button on your remote control to select Lock adult programs, and then press the OK button.
then press the OK button. The Lock channels Settings screen appears, showing a list of all channels (both locked and unlocked channels). • If a channel is unlocked, no lock icon is shown. • If a channel is already locked, a lock icon is shown. Viewers cannot view locked channels without entering the correct parental locking PIN. 3. Press the OK button on on the remote control to go to the channel list. 4.
want to use—for example, Movie Ratings (MPAA) or US TV Parental Guidelines (VCHIP-style). Press OK. Note: Turning parental locking on or off based on TV ratings does not affect any V-Chip settings in your TV. 3. Use the DOWN ARROW or CHANNEL/PAGE button on your remote control to select the rating system, such as Movie Ratings, and then press the OK button on your remote control. The Settings screen appears for the rating system that you selected. 4.
Changing Your PIN To change your PIN at anytime, do this: 1. Open the Parental Locking Settings screen as described in Getting Ready to Use Parental Locking. 2. Use the arrow buttons on your remote control to select Change PIN, and then press OK. 3. Use the number buttons on your remote control to enter a four-digit PIN, and then enter the PIN again to confirm it. Now anyone who wants to change parental-locking settings must specify the new PIN. 4.
To completely turn off parental locking and eliminate your PIN here’s what you do: 1. Open the Parental Locking Settings screen. 2. Use the arrow buttons on your remote control to select Turn off locking, and then press OK. 3. Select Reset all parental locks, and then press OK. A message appears, asking you to confirm your choice. 4. In the message, select Reset, and then press OK. The set-top box dismisses the Parental Locking Settings screen and returns to the last channel tuned.
• If you unlocked one program, tune to the program to verify that it is now locked. • If you turned off parental locking for 4 hours, display the General Settings screen (press MENU, select settings on the horizontal menu bar, select General, and then press OK). The Parental locking element now shows a lock icon that is locked. Watching a Locked Program You use parental locking to prevent children or other unauthorized viewers from watching or renting specific programs.
• To remain on the locked program screen without unlocking the program, select Don’t unlock. You can then tune to another channel. If you press PAUSE to pause the channel while watching an unlocked program and the channel begins showing a locked program, you can still watch, rewind, and fast-forward in the unlocked program. However, if you try to watch or fast-forward into the locked program, the locked program screen appears.
To search by using advanced search features, do this: 1. Access the Search screen as described in To search for a specific program. 2. Select the on-screen Options button with the arrow buttons, and press OK TDS TV displays the Search screen’s Options menus. You can choose options from the Filter Results menu or the Keyboard menu. The Filter Results menu lets you choose which search results to display: • All results: Displays people, program titles, and VOD offerings matching the search text.
Creating or Revising Favorites Lists The Favorites screen is an abbreviated program guide containing only the channels and programs you’ve chosen. Up to five favorites lists can be created per set-top box. To set up or revise a list of favorites do this: 1. Press the MENU button on your remote control. 2. Use the RIGHT ARROW button to select Settings on the horizontal menu bar. 3. Use the DOWN ARROW button to select Television. Press the OK button. 4. Use the DOWN ARROW button to select Set up favorites.
9. Use the LEFT ARROW and UP ARROW to select Save, and then press the OK button. Note: To save your settings, you must select Save and press OK before you leave the Favorite channels Settings screen. Select Don’t save to exit from the screen without saving your settings. The favorite channels list remains unchanged. You can repeat the process up to four more times. One-Touch Channel Favorites Set Up 1.
3. If you have multiple Favorites lists saved, use the UP and DOWN ARROW keys to select your desired Favorites list and press the OK button. NOTE: To return to All Channels in your programming, follow steps 2 and 3 above, and select All Channels from the list presented Hiding and Showing Channels in the Program Guide TDS TV gives you access to many channels. Use the Customize Channels Settings screen to determine which channels appear in the program guide.
5. Using the arrow buttons, you can do the following: • Hide a channel that is currently displayed in the program guide. Select the checked check box for the channel, and then press the OK button. • Make a hidden channel reappear in the program guide. Select the unchecked check box for the channel, and then press the OK button. • Make all channels appear in the program guide. Select Check All, and then press the OK button. • Show only the unchecked boxes (hidden channels) in the list.
• 1080i high definition: Used if you have a wide-screen TV that displays high-definition images (1080 pixels wide). 6. Use the arrow buttons to select Continue, and then press OK. To exit from this screen without changing the aspect ratio, select Cancel Changes and press OK. Changing Closed-Captioning Settings Closed captioning displays the audio portion of a television program as text on the screen. TDS TV has closedcaptioning off by default. To enable closed captioning, do this: 1.
Changing Digital Audio Output To change the digital audio output: 1. Press the MENU button on your remote control. 2. Use the RIGHT ARROW button to select Settings on the horizontal menu bar. 3. Select Audio, select Digital audio output, and then press the OK button. The Digital audio output settings screen appears. 4. Use the DOWN ARROW button to select Stereo or Surround sound. Select Save, then press the OK button.
If two or more set-top boxes are tuned to the same program, only one stream is used. For example, suppose your home has three set-top boxes and three streams. If people are watching the local news in both the living room and a bedroom, only one stream is used, leaving two streams available for recording shows or watching other live television. If you try to watch more HD programs than you have HD streams, a conflict occurs.
If you attempt to change channels to an HD channel when all HD streams are in use, HD channels display the following screen. If you press the OK button, following alert is displayed: You can choose from three options: • Watch in SD. You will be tuned to the standard definition channel. • Try again later. If a stream is available, the full screen video is displayed. • Select a recording. The Recorded TV screen is displayed.
FCC REQUIRED INFORMATION Commission (FCC), shall become a fixture to the realty upon installation. Products and Services Offered TDS TV Basic service offered by TDS Telecommunications Corp. (“TDS”) is the lowest level of service available, providing 20 or more channels. It includes local programming and may include franchise-required channels. Programming varies by community and is subject to change at any time.