
User guide


Chapter 7. Configuring the Cisco 3012 InfiniBand to Ethernet gateway 135
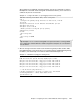
2. After you have configured all of the tabs of the Add Bridge Group window, click Add to
create the new bridge group BG1 and make it active. Figure 7-13 shows the bridge group
with tagged VLAN 88 selected and ready for use.
Figure 7-13 BG1 ready to use tagged packets on VLAN 88
3. The final step on the 3012 is to save this configuration to NVRAM
From the main page of the Element Manager, click Maintenance → Save Config to save
the configuration to NVRAM.
4. After saving the configuration of the 3012, you need to configure the 4948. In this
example, we use the same connection that we used in the previous section, connecting
the Ethernet gateway module to the 4948 on port gi1/16.
As noted in the previous section, VLAN 88 was an arbitrary choice. The VLAN that you
choose should be the same IP subnet that is desired by the InfiniBand clients.
On the 4948 side, the only way to have a port support tagged frames is to set the port or
ports into trunked mode. Furthermore, Cisco switches have the concept of a single
untagged VLAN, called the Native VLAN. Any untagged packet coming into a trunk port
will be placed on this Native VLAN (default VLAN 1, but can be changed).
Because the bridge group is now using tagged packets for VLAN 88, we must make sure
VLAN 88 is not the native VLAN. To restate this, this means that what ever VLAN tag we
set on the Ethernet gateway module, cannot be the native VLAN on the upstream Cisco
switch. To address this on the 4948, we define the connecting ports as a trunk, leave the
native VLAN at 1, and permit VLAN 88 on this trunk (default is all VLANs permitted, but
best practices usually say to limit the allowed VLANs to only those that are needed). In
doing this, since the packets coming up from the gateway module will be tagged with
VLAN 88, the 4948 port will place them on VLAN 88 inside the 4948, and packets can then
get to the desired subnet.
Contact your network engineer if you are not sure about what you need to do for this to
work.
Note that it is assumed that VLAN interface already has been created and is configured as
desired for this lab. Just in case, Example 7-1 on page 130 shows how to configure the
management interface for VLAN 88.
Note: As mentioned previously, all changes done through the GUI take effect
immediately and are placed in the running config, but the changes in the running config
are not explicitly saved to NVRAM until you perform this step.