October 2003 QPSK (Release A63) Software Upgrade and Installation Instructions Overview Introduction These upgrade and installation instructions provide you with the following information: An overview of the QPSK A63 software upgrade Guidelines that define how and when to monitor Explorer® Digital Home Communications Terminals (DHCTs) sign on rates A description of the optional QPSK range extension features which allow DHCTs to sign on to the system and operate at extended distances from the headend
Overview, Continued Audience These instructions are written for headend technicians using the Model D9482 QPSK Modulator with either the Cisco Resident Application (SARA) or the Pioneer resident application. These instructions are also written for Cisco Services engineers and cable service provider personnel qualified in the following skills required to successfully complete the upgrade process: Working knowledge of UNIX vi editor Important: The UNIX vi editor is not intuitive.
Overview, Continued System Release 2.1.1 and System Release 3.0.1 For more information about SR 2.1.1 and SR3.0.1, refer to the following documents: System Release 2.1.1 Release Notes, part number 4002061 SR 3.0.1 Release Notes, part number 4002058 SR 2.1.1 and SR 3.0.1 UniPack Upgrade Installation Instructions, part number 4002062 SR 2.1.1 / 3.0.1 to SR 2.2 /3.
Overview, Continued In This Document These instructions contain the following topics.
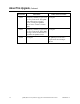
About This Upgrade Introduction Several changes (features and improvements) are introduced in the QPSK A63 software and other changes are currently in development. This section provides brief descriptions of the change requests (CRs) implemented in the QPSK A63 software, the CRs currently in development, and the impact of each CR on the subscriber or the cable service provider.
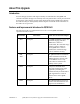
About This Upgrade, Continued CR Number Subscriber Cable Service Provider 11110 No impact The QPSK modulator software is modified to automatically reprovision Explorer 3100 and 2100 DHCTs that are moved from one QPSK demodulator to another. 11288 No impact The subnet configuration can be modified to more realistically accommodate the needs and the size of the system, and to conservatively use IP address space. Note: The QPSK software is still limited to a maximum of 16,000 IP addresses.
About This Upgrade, Continued CR Number Subscriber Cable Service Provider 17973 No impact To enhance the debugging of system problems, only problematic DHCTs are logged to the DNCS. Ordinary non-responsive DHCTs are not logged as errors as they can mislead problem-solving efforts. 17998 No impact The corruption of the DAVIC Reprovision Frequency message that was causing DHCTs to write over their memory is eliminated.
About This Upgrade, Continued CR Number Subscriber Cable Service Provider 6888 Temporary inability to get or use No impact two-way connection. The QPSK modulator will reboot when it has exhausted its available buffers. This may occur due to heavy traffic load, such as when there are a large number of DHCTs signing on. After the QPSK modulator reboots, all of its DHCTs attempt to sign on.
About This Upgrade, Continued CR Number 14309 Subscriber Cable Service Provider Temporary inability to get or use No impact two-way connection. A sustained high rate of small packets of upstream traffic causes a QPSK modulator to reboot. Note: This is not typical usage. 20337 No impact As a craft port user, if you type stblist without a number parameter when a large population of DHCTs is signed on, the entire list of DHCTs is printed. This can lead to a QPSK reboot.
About This Upgrade, Continued CR Number 10 Subscriber Cable Service Provider 27016 Temporary inability to get or use No impact two-way connection. The QPSK sends unnecessary ranging alarms, causing the QPSK to reboot due to volume of alarm traffic. 27017 Temporary inability to get or use No impact two-way connection. When RPC message volume accumulates in the buffer the QPSK reboots. 27239 No impact The QPSK provision fails a couple times after multiple reboots.
The Upgrade Process Introduction This section includes a list of procedures that are not included in system release installation instructions. provides a timeline for each of the upgrade tasks, and describes the system requirements for upgrading to QPSK A63. If SR 2.1.1, SR 3.0.1 or Later Is Installed on Your System If SR 2.1.1, SR 3.0.
The Upgrade Process, Continued How Much Time is Required to Install the QPSK A63 Software? The initial monitoring of the system and installing the QPSK A63 software requires approximately 2 hours. When installation is complete, continue to monitor the DHCT sign-on traffic for several hours. The following table provides a description and approximate time required for each stage of the QPSK A63 upgrade and installation process. Stage Description Time Required 1 Monitor the available DNCS disk space.
The Upgrade Process, Continued Is Service Impacted During the Upgrade? The service impact to subscribers will vary based on the applications installed on your system and how the applications react to a loss of both the forward and reverse QPSK data paths. For a subscriber not actively using an interactive application the outage will most likely go unnoticed. System Requirements The installation information in these instructions applies only to systems operating SR 2.1.1 or SR 3.0.
Monitor the DNCS Disk Space Introduction The utilities used in monitoring the system during the loading of QPSK A63 software require that you enable the process tracing for some DNCS functions. This tracing may result in a significant increase in the size of the dncsLog file. If allowed to grow unchecked, the dncsLog file could, in rare cases, fill the hard disk and as a result cause the DNCS to stop functioning.
Monitor DHCT Sign-On Rates Introduction When DHCTs download new software for the operating system and resident application, they lose the contents of their volatile memory. After the download, DHCTs sign back on to the network and their network configuration data is reloaded. The signonCount utility is useful in monitoring the rate at which DHCTs sign on to the network.
Monitor DHCT Sign-On Rates, Continued Two Modes of Operation You can run the signonCount utility in two modes: Fix Mode Off and Fix Mode On. Both modes help system operators monitor the rate at which DHCTs are trying to sign on to the network. When run in Fix Mode Off, the utility takes no corrective action regarding DHCTs that are having difficulty signing on. When run in Fix Mode On, however, the utility reboots those DHCTs that have tried to sign on more than three times during a 10-minute period.
Monitor DHCT Sign-On Rates, Continued 2. Type signonCount -h and press Enter. Result: The Help window for the signonCount utility opens. 3. Press the Spacebar as often as necessary to page through the Help window. 4. After reviewing the signonCount utility Help window, go to Set DNCS Tracing Levels, next in these instructions.
Set DNCS Tracing Levels Introduction To ensure that the DNCS captures the maximum level of detail, you need to set the tracing levels of three DNCS processes to level 2. The three DNCS processes are: hctmConfig hctmMac hctmProvision. CAUTION: Activating the tracing process as described in this section could cause the dncslog file to grow large enough to fill the hard disk. If this is allowed to happen, the DNCS will stop functioning. While gathering data, carefully monitor the disk usage.
Set DNCS Tracing Levels, Continued 3. Scroll down until the hctmConfig, hctmMac, and hctmProvision processes come into view. 4. Are the tracing levels for all three of these processes already set to 2? If yes, continue with What to Look for in the signonCount Data, next in these instructions. If no, go to step 5 to begin setting the tracing levels. Note: The Trace column lists the current tracing level. Example: In the example in step 3, the tracing levels are all set to 0. 5.
Set DNCS Tracing Levels, Continued 7. Repeat steps 5 and 6 for the hctmMac and hctmProvision processes (if necessary) to update the tracing level to 2. Example: When you are finished, the DNCS Tracing Management window should look like the following example. The tracing levels for the hctmConfig, hctmMac, and hctmProvision utilities are set to level 2. 20 8. Click File and select Close to close the DNCS Tracing Management window. 9.
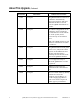
What to Look for in the signonCount Data Introduction This section provides instructions on how to display the signonCount utility interface, provides an explanation of each field of the interface, and states which fields you should focus on first. Displaying the signonCount Interface Follow these steps to display the interface of the signonCount utility. 1. If necessary, open an xterm window on the DNCS. 2. Click and drag the edges of the xterm window to maximize the screen width.
What to Look for in the signonCount Data, Continued Fix Mode OFF OFF OFF OFF OFF OFF OFF OFF OFF OFF FIX Mode—This field reveals whether the signonCount utility is configured to correct DHCT sign-on problems (Fix Mode On) or whether the utility is running in information-only mode (Fix Mode Off). Note: By default, the utility runs in Fix Mode Off. Important: Do not change modes unless you have been instructed to do so by Cisco Services engineers.
What to Look for in the signonCount Data, Continued DAVIC Lost 30 23 23 19 28 26 33 20 32 17 Threshold Exceeds Ver UCfg 0 0 0 0 0 0 0 0 0 0 0 0 0 0 0 0 0 0 0 0 Inv HCT Type 0 0 0 0 0 0 0 0 0 0 IHCT Wrng Mod 0 0 0 0 0 0 0 0 0 0 4002804 Rev C DAVIC Lost—This field indicates the number of DHCTs that have lost the communication link with the QPSK modulator. The QPSK modulator then sends a message to DHCTs that have lost the communication link.
What to Look for in the signonCount Data, Continued Total In-Srvc 2-Way 100694 100694 100695 100695 100697 100697 100697 100702 100703 100704 Total In-Srvc 2-Way—The utility reports the number of DHCTs listed in the database with a status of In-Service 2-Way. These DHCTs should be capable of two-way communication.
What to Look for in the signonCount Data, Continued TOTAL PERCENT SIGN-ON 81.68% 81.68% 81.67% 81.66% 81.66% 81.66% 81.65% 81.65% 81.68% 81.68% QPSK Reboots TOTAL PERCENT SIGN-ON—The DNCS reports the percentage of DHCTs with two-way capability that are signed on to your network. QPSK Reboots—In the event that a QPSK modulator reboots, the name and ID of the modulator is listed in this column.
Install QPSK A63 Software Onto the DNCS Introduction This section provides instructions for installing the QPSK A63 software onto the DNCS. If your system is operating on a system release earlier than SR or SR 3.0.1, complete the procedures in this section. Important: If SR 2.1.1, SR 3.0.1 or later is installed on your system, the QPSK A63 software was installed at the same time. Do not install the QPSK A63 software again.
Install QPSK A63 Software Onto the DNCS, Continued 7. Type df and Enter to confirm that the system mounted the CD successfully. Result: The last line of the df command output lists the number of free disk blocks on the CD. Note: The number of free disk blocks existing on the CD does not matter. The fact that the CD is listed in the df command output verifies that the system successfully mounted the CD. 8. Type swmtool -d /cdrom/cdrom0 and Enter. Result: The Admintool: Add Software window opens. 9.
Install QPSK A63 Software Onto the DNCS, Continued 15. Select Add on the Admintool: Add Software window. Results: A copyright message appears. The QPSK software begins to install. 16. When the system displays a message that indicates that the QPSK software installed successfully, press the right mouse button while the cursor is anywhere within the Admintool: Add Software window. Result: A Term Pane window opens. 17.
Install QPSK A63 Software Onto the DNCS, Continued Verifying the DNCS IP Address The DNCS IP address in the qpsk.config file is normally automatically updated during the installation process. However, if the disk you are using to install QPSK A63 is dated earlier than 1/3/03, it is recommended that you complete the steps in this section to verify that the qpsk.config file is updated with your DNCS IP address. 1. From an xterm window on the DNCS, log in as a root user. 2.
Download QPSK A63 Software to the QPSK Modulators Introduction After installing the QPSK A63 software on the DNCS, your next step is to upgrade the QPSK modulators. When you reset a QPSK modulator, the DNCS downloads the new QPSK software to the QPSK modulator. Follow the instructions in this section to download the QPSK A63 software to the QPSK modulators. Do I Need to Place the QPSKs in Broadcast Mode Before Upgrading? No.
Verify QPSK A63 Software Downloaded Verifying Software Download To verify that the QPSK A63 software downloaded to the DHCTs successfully, complete the following steps. 1. Is the QPSK modulator located at the headend? If yes, verify that the new software downloaded successfully by completing the following steps. a) b) Press the Options button on the front panel of the QPSK modulator until the LED displays OPTION: 302 App Version.
Continue to Monitor the DHCT Sign-On Traffic Introduction With the signonCount interface displayed, continue to monitor the signonCount utility output to determine the health of your system before downloading the QPSK A63 software to the next QPSK modulator. Monitoring the DHCT Sign-On Traffic To determine when it is safe to download the QPSK A63 software to the next QPSK modulator, complete the following steps. 1. Continue to monitor the DHCT sign-on traffic.
Continue to Monitor the DHCT Sign-On Traffic, Continued 3. Wait approximately 15 minutes before resetting the next QPSK. Then, repeat the procedures in the Download QPSK A63 Software to the QPSK Modulators and Verify QPSK A63 Software Downloaded sections, earlier in these instructions, for each QPSK modulator you are upgrading. Important: After resetting each QPSK modulator, continue to monitor the DHCT sign on traffic.
What Is the QPSK Range Extension Feature? Introduction With prior versions of software, the Model D9482 QPSK Modulator was capable of successfully connecting and operating DHCTs within a distance of approximately 128 km round trip (64 km each way when forward and reverse paths are equal). This distance limitation is mainly due to the width of the ranging slots defined in the Digital Audio-Visual Council (DAVIC) standard for operation over the hybrid fiber-coax (HFC) plant.
What Is the QPSK Range Extension Feature?, Continued Distance and Delay The distance that appears on the front panel of the QPSK modulator is approximate and based on fiber with a propagation velocity of 68 percent of the speed of light in a vacuum. Note: The modulator has no way of calculating how much coax or fiber is deployed between and to the DHCTs.
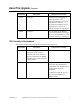
What Is the QPSK Range Extension Feature?, Continued Range Distance Settings Diagram The following diagram illustrates the correct range distance settings. Example: With 155 km set on the QPSK, the closest distance you could locate a DHCT to a QPSK modulator is 155 km. The farthest distance you could locate a DHCT to a QPSK modulator is 217 km. Network Configuration Application Rules Follow these application rules when configuring the network for the QPSK rangingdistance extension mode.
What Is the QPSK Range Extension Feature?, Continued Rule 4002804 Rev C Description 4 The ranging radius is 0 km to 64 km, with 0 km set at the programmed cable length. 5 Transport distances are in integer multiples of 31 km, to a maximum of 248 km. 6 All four demodulators are delayed by the same value programmed in the QPSK modulator.
Activate Range Extension Feature (Optional) Introduction This section provides instructions for changing the modulator-to-node distance settings for the QPSK modulators on your system. Changing the Distance Settings If the modulator-to-node distance of the QPSK modulators on your system is more than 64 km, complete these steps to change the distance settings. 1. If the hub you are configuring supports existing customers, disconnect the modulator RF output cable for 15 minutes. Otherwise, go to step 2.
Activate Range Extension Feature (Optional), Continued 5. Check the delay time on the DHCT diagnostic screen by choosing one of the following options: For sites using SARA, look at the RF Statistical Information diagnostic screen, and choose one of the following options: If the delay value is less than 761, the delay time is correct. Go to step 6. If the delay value is more than 761, the DHCT is ―too close.‖ Repeat step 2 and lower the modulator-to-node distance. Then, reboot the QPSK modulator.
Rollback Procedures Introduction After loading the QPSK A63 software, if you notice that the system is reacting adversely, call Cisco Services. If they determine it is necessary to roll back the procedure, complete the steps in this section to restore the qpsk.config file and to deactivate the signonCount utility. Important: Do not initiate these rollback procedures before contacting Cisco Services. Restoring the qpsk.config Files To restore the qpsk.config files, complete the following steps. 1.
For Information If You Have Questions If you have technical questions, call Cisco Services for assistance. Follow the menu options to speak with a service engineer.
Cisco Systems, Inc. 5030 Sugarloaf Parkway, Box 465447 Lawrenceville, GA 30042 678 277-1120 800 722-2009 www.cisco.com Cisco and the Cisco logo are trademarks or registered trademarks of Cisco and/or its affiliates in the U.S. and other countries. A listing of Cisco's trademarks can be found at www.cisco.com/go/trademarks. Third party trademarks mentioned are the property of their respective owners. The use of the word partner does not imply a partnership relationship between Cisco and any other company.