PA-T3+ Serial Port Adapter Installation and Configuration Product Numbers: PA-T3+(=), PA-2T3+(=) Platforms Supported: Catalyst 6000 Family FlexWAN Module in Catalyst 6000 Family Switches, Cisco 7200 Series, Cisco 7301 Router, Cisco 7304 PCI Port Adapter Carrier Card in the Cisco 7304 Router, Cisco 7401ASR Router, VIP in the Cisco 7000 Series and Cisco 7500 Series Corporate Headquarters Cisco Systems, Inc. 170 West Tasman Drive San Jose, CA 95134-1706 USA http://www.cisco.
THE SPECIFICATIONS AND INFORMATION REGARDING THE PRODUCTS IN THIS MANUAL ARE SUBJECT TO CHANGE WITHOUT NOTICE. ALL STATEMENTS, INFORMATION, AND RECOMMENDATIONS IN THIS MANUAL ARE BELIEVED TO BE ACCURATE BUT ARE PRESENTED WITHOUT WARRANTY OF ANY KIND, EXPRESS OR IMPLIED. USERS MUST TAKE FULL RESPONSIBILITY FOR THEIR APPLICATION OF ANY PRODUCTS.
C O N T E N T S Preface vii Objectives vii Organization viii Related Documentation viii Obtaining Documentation x Cisco.com x Documentation CD-ROM x Ordering Documentation x Documentation Feedback x Obtaining Technical Assistance xi Cisco.
Contents Cisco 7301 Router Interface Addresses 1-12 Cisco 7304 PCI Port Adapter Carrier Card Interface Addresses Cisco 7401ASR Router Interface Addresses 1-13 VIP Interface Addresses 1-13 CHAPTER 2 Preparing for Installation 2-1 Required Tools and Equipment 2-1 Software and Hardware Requirements 75-Ohm In-Line Coaxial Attenuator CHAPTER 3 1-13 2-2 2-3 Checking Hardware and Software Compatibility 2-3 Safety Guidelines 2-3 Safety Warnings 2-3 Electrical Equipment Guidelines 2-8 Telephone Wirin
Contents Configuring NRZI Format 4-11 Configuring Cyclic Redundancy Checks 4-12 Configuring Half-Duplex and Binary Synchronous Communications in Cisco 7200 Series Routers Setting the Bandwidth 4-15 Defining the DSU Mode 4-15 Enabling T3+ Scrambling 4-16 Specifying T3+ Framing 4-16 Setting the Cable Length 4-16 4-13 Checking the Configuration 4-16 Using show Commands to Verify the New Interface Status 4-17 Using the show version or show hardware Commands 4-18 Using the show diag Command 4-21 Using the s
Contents PA-T3+ Serial Port Adpater Installation and Configuration vi OL-3505-03
Preface This preface describes the objectives and organization of this document and explains how to find additional information on related products and services.
Preface Organization Organization This document contains the following chapters: Section Title Description Chapter 1 Overview Describes the PA-T3+ and its LED displays, cables, and receptacles. Chapter 2 Preparing for Installation Describes safety considerations, tools required, and procedures you should perform before the actual installation. Chapter 3 Removing and Installing Port Adapters Describes the procedures for installing and removing PA-T3+ port adapters in the supported platforms.
Preface Related Documentation • Cisco 7200 series routers: – For port adapter hardware and memory configuration guidelines, refer to the Cisco 7200 Series Port Adapter Hardware Configuration Guidelines. – For hardware installation and maintenance information (including the Cisco 7206 or Cisco 7206VXR as a router shelf in a Cisco AS5800 Universal Access Server), refer tot he the installation and configuration guide that shipped with your Cisco 7200 series router.
Preface Obtaining Documentation Obtaining Documentation Cisco provides several ways to obtain documentation, technical assistance, and other technical resources. These sections explain how to obtain technical information from Cisco Systems. Cisco.com You can access the most current Cisco documentation on the World Wide Web at this URL: http://www.cisco.com/univercd/home/home.htm You can access the Cisco website at this URL: http://www.cisco.
Preface Obtaining Technical Assistance You can e-mail your comments to bug-doc@cisco.com. You can submit comments by using the response card (if present) behind the front cover of your document or by writing to the following address: Cisco Systems Attn: Customer Document Ordering 170 West Tasman Drive San Jose, CA 95134-9883 We appreciate your comments. Obtaining Technical Assistance Cisco provides Cisco.
Preface Obtaining Technical Assistance • Priority level 2 (P2)—Operation of an existing network is severely degraded, or significant aspects of your business operations are negatively impacted by inadequate performance of Cisco products. You and Cisco will commit full-time resources during normal business hours to resolve the situation. • Priority level 1 (P1)—An existing network is “down,” or there is a critical impact to your business operations.
Preface Obtaining Additional Publications and Information Obtaining Additional Publications and Information Information about Cisco products, technologies, and network solutions is available from various online and printed sources. • The Cisco Product Catalog describes the networking products offered by Cisco Systems, as well as ordering and customer support services. Access the Cisco Product Catalog at this URL: http://www.cisco.com/en/US/products/products_catalog_links_launch.
Preface Obtaining Additional Publications and Information PA-T3+ Serial Port Adapter Installation and Configuration xiv OL-3505-03
C H A P T E R 1 Overview This chapter describes the PA-T3+ and contains the following sections: • Port Adapter Overview, page 1-1 • Features, page 1-2 • Interoperability Guidelines for PA-T3+ DSUs, page 1-3 • LEDs, page 1-3 • Cables and Connectors, page 1-4 • Management Information Base, page 1-5 • Port Adapter Slot Locations on the Supported Platforms, page 1-5 • Identifying Interface Addresses, page 1-10 Port Adapter Overview The PA-T3+ port adapter provide a full-duplex operation at T3
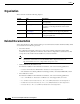
Chapter 1 Overview Features Figure 1-1 One-Port PA-T3+ RC LK FE RF RL R Figure 1-2 15966 LL AIS OO F XM T VR RC EN AB LE D 1DS3+ SERIAL Two-Port PA-2T3+ TR 15967 LL OO F LL AIS AIS OO F XM RC VR RC LK FE RF RL RC LK FE RF RL TR XM VR RC EN AB LE D 2DS3+ SERIAL Features The PA-T3+ provides the following features: • Single-wide port adapter for the following: – Catalyst 6000 family FlexWAN module – VIP in all Cisco 7000 series and Cisco 7500 series routers – Cisco 7304 PCI P
Chapter 1 Overview Interoperability Guidelines for PA-T3+ DSUs • Support for remote and local loopbacks • B3ZS line coding • Scrambling and bandwidth reduction Interoperability Guidelines for PA-T3+ DSUs The PA-T3+ supports several types of integrated data service units (DSUs). Table 1-1 lists the feature compatibilities of PA-T3+ DSUs.
Chapter 1 Overview Cables and Connectors The following conditions must be met before the PA-T3+ is enabled: • The PA-T3+ is correctly connected and is receiving power. • A valid software image for the port adapter has been downloaded successfully.
Chapter 1 Overview Management Information Base You can test the DTE-to-DCE cable connection by using the loopback dte command. See the “Using loopback Commands” section on page 4-25, for more information. Management Information Base Management Information Base (MIB) attributes are readable and writable across ILMI through use of the SNMP. The one-port PA-T3+ supports all MIB-II (RFC 1213) and the DS3 interface MIB (RFC 1407).
Chapter 1 Overview Port Adapter Slot Locations on the Supported Platforms Figure 1-6 Catalyst 6000 Family Switch with Blank Port Adapters Installed on FlexWAN Module WS-X6K-SUP1 Supervisor engine ST 1 AT US SY ST EM TI VE AC R M G M Switch 100% T RES PW Load DTE/ DCE ET PORT 1 CONSOLE SUPERVISOR I 1% PCMCIA PORT 2 NK EJECT LI EJECT NK LI LI NK WS-X6K-SUP1 Redundant supervisor engine Switch 100% T M G US EM M VE ET AT R ST TI ST SY AC PW RES 2 Load DTE/ DCE PORT
Chapter 1 Overview Port Adapter Slot Locations on the Supported Platforms Figure 1-7 Port Adapter Slots in the 7206 3 2 1 0 6 TOKEN RING 5 4 RJ4 5 0 MII EN AB LE D 3 2 3 LINK 1 0 2 1 D 0 LE AB 3 EN LIN K FAST ETHERNET ETHERNET 10BT 2 TX RX 4 TX RX 3 RX 2 RX 1 TX 0 T T O EJ SL EN PC M AB C EC IA LE D 0 FE M II 5 J-4 R II M N E 5 J-4 R EN R 5 PW J-4 R INK O K 1 O L Port adapter slot 5 Port adapter slot 3 Port adapter slot 1 28329 1 FAST ETHERNET INP
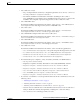
Chapter 1 Overview Port Adapter Slot Locations on the Supported Platforms Figure 1-9 7300-C Cisco 7304 PCI Port Adapter Carrier Card—Port Adapter Installed C-PA 84653 D R LE LS RIE M AB EL AR AR EN RX C RX C X AL R OIR STATUS 7300 PA ATM CARRIE R The Cisco 7304 PCI Port Adapter Carrier Card installs in Cisco 7304 router module slots 2 through 5. See Figure 1-10 for module slot numbering on a Cisco 7304 router.
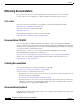
Chapter 1 Overview Port Adapter Slot Locations on the Supported Platforms Figure 1-11 Cisco 7401ASR Router with a Port Adapter Installed AB LE D S IER LL R R M C E C A R LA RX RX RX A TX RX ENHANCED ATM 57680 EN VIP Slot Numbering Figure 1-12 shows a partial view of a VIP motherboard with installed port adapters. With the motherboard oriented as shown in Figure 1-12, the left port adapter is in port adapter slot 0, and the right port adapter is in port adapter slot 1.
Chapter 1 Overview Identifying Interface Addresses Figure 1-13 Interface Processor Slot Numbers—Cisco 7505 Shown CO NS OL E HA LT ROUTE SWITCH PROCESSOR RE SE T CP U EJ EC T SL SLO OT T 0 1 NO RM AL VIP in interface processor slot 3 Slot 3 Slot 2 Interface processor Slot 1 slots 29619 Slot 0 Note In the Cisco 7000, Cisco 7507, and Cisco 7513 chassis, the VIP is installed vertically. In the Cisco 7010 and Cisco 7505 chassis, the VIP is installed horizontally.
Chapter 1 Overview Identifying Interface Addresses Table 1-3 Identifying Interface Addresses Platform Catalyst 6000 family FlexWAN module in Catalyst 6000 family switches Interface Address Format Numbers Syntax 1 Module-slot-number/port-adapterbay-number/interface-port-number Module slot number—2 through 6 or 9 (depending on the number of slots in the switch) 3/0/0 Port adapter bay—always 0 or 1 Interface port—always 0 (for the one-port PA-T3+[=]); 0 or 1 (for the two-port PA-2T3+[=]) Cisco 7200
Chapter 1 Overview Identifying Interface Addresses 1. Slot 1 is reserved for the supervisor engine. If a redundant supervisor engine is used, it must go in slot 2; otherwise, slot 2 can be used for other modules. 2. Port adapter slot 0 is reserved for the Fast Ethernet port on the I/O controller (if present). Catalyst 6000 Family FlexWAN Module This section describes how to identify the interface addresses used for the PA-4T+ on the Catalyst FlexWAN module in the Catalyst 6000 family switches.
Chapter 1 Overview Identifying Interface Addresses Cisco 7304 PCI Port Adapter Carrier Card Interface Addresses This section describes how to identify the interface addresses used for the PA-T3+ and PA-2T3+ in the Cisco 7304 PCI Port Adapter Carrier Card in Cisco 7304 routers. The interface address is made of a two-part number in the format port-adapter-slot-number/interface-port-number. The Cisco 7304 PCI Port Adapter Carrier Card installs into Cisco 7304 router module slots 2 through 5 (See Figure 1-10.
Chapter 1 Overview Identifying Interface Addresses PA-T3+ Serial Port Adapter Installation and Configuration 1-14 OL-3505-03
C H A P T E R 2 Preparing for Installation This chapter describes the general equipment, safety, and site preparation requirements for installing the PA-T3+ port adapter.
Chapter 2 Preparing for Installation Software and Hardware Requirements Software and Hardware Requirements Table 2-1 lists the recommended minimum Cisco IOS software release required to use the one-port PA-T3+(=) and two-port PA-2T3+(=) in supported router platforms.
Chapter 2 Preparing for Installation 75-Ohm In-Line Coaxial Attenuator 75-Ohm In-Line Coaxial Attenuator A 75-ohm in-line coaxial attenuator may be required to tune the signal between the PA-T3+ and the far-end equipment, if the port adapter is experiencing line code violations (LCVs). LCVs occur when the far-end equipment transmit signal saturates the front-end receiver of the PA-T3+.
Chapter 2 Preparing for Installation Safety Guidelines IMPORTANT SAFETY INSTRUCTIONS Warning This warning symbol means danger. You are in a situation that could cause bodily injury. Before you work on any equipment, be aware of the hazards involved with electrical circuitry and be familiar with standard practices for preventing accidents. To see translations of the warnings that appear in this publication, refer to the translated safety warnings that accompanied this device.
Chapter 2 Preparing for Installation Safety Guidelines Attention IMPORTANTES INFORMATIONS DE SÉCURITÉ Ce symbole d'avertissement indique un danger. Vous vous trouvez dans une situation pouvant causer des blessures ou des dommages corporels. Avant de travailler sur un équipement, soyez conscient des dangers posés par les circuits électriques et familiarisez-vous avec les procédures couramment utilisées pour éviter les accidents.
Chapter 2 Preparing for Installation Safety Guidelines Advarsel VIKTIGE SIKKERHETSINSTRUKSJONER Dette varselssymbolet betyr fare. Du befinner deg i en situasjon som kan forårsake personskade. Før du utfører arbeid med utstyret, bør du være oppmerksom på farene som er forbundet med elektriske kretssystemer, og du bør være kjent med vanlig praksis for å unngå ulykker. For å se oversettelser av advarslene i denne publikasjonen, se de oversatte sikkerhetsvarslene som følger med denne enheten.
Chapter 2 Preparing for Installation Safety Guidelines PA-T3+ Serial Port Adapter Installation and Configuration OL-3505-03 2-7
Chapter 2 Preparing for Installation Safety Guidelines Electrical Equipment Guidelines Follow these basic guidelines when working with any electrical equipment: • Before beginning any procedure requiring access to the chassis interior, locate the emergency power-off switch for the room in which you are working. • Disconnect all power and external cables before moving a chassis; do not work alone when potentially hazardous conditions exist.
Chapter 2 Preparing for Installation Safety Guidelines • Do not perform any action that creates a potential hazard to people or makes the equipment unsafe; carefully examine your work area for possible hazards such as moist floors, ungrounded power extension cables, and missing safety grounds.
Chapter 2 Preparing for Installation Safety Guidelines PA-T3+ Serial Port Adapter Installation and Configuration 2-10 OL-3505-03
C H A P T E R 3 Removing and Installing Port Adapters This chapter describes how to remove the PA-T3+ port adapter from supported platforms and also how to install a new or replacement port adapter.
Chapter 3 Removing and Installing Port Adapters Online Insertion and Removal Figure 3-1 Handling a Port Adapter Metal carrier H6420 Printed circuit board Online Insertion and Removal Several platforms support online insertion and removal (OIR) of port adapters. Cisco 7200 series routers support OIR for all port adapter types, therefore you do not have to power down routers when removing and replacing a PA-T3+ on Cisco 7200 series routers, Cisco 7301 routers, or Cisco 7401ASR routers.
Chapter 3 Removing and Installing Port Adapters Warnings and Cautions Each module has a bus connector that connects it to the router. The connector has a set of tiered pins in three lengths that send specific signals to the system as they make contact with the module. The system assesses the signals it receives and the order in which it receives them to determine if a module is being removed from or introduced to the system.
Chapter 3 Removing and Installing Port Adapters Port Adapter Removal and Installation Port Adapter Removal and Installation In this section, the illustrations that follow give step-by-step instructions on how to remove and install port adapters.
Chapter 3 Removing and Installing Port Adapters Port Adapter Removal and Installation FlexWAN Module—Removing and Installing a Port Adapter Note: You must first remove the Catalyst 6000 FlexWAN module from the chassis before removing a port adapter from the Catalyst 6000 FlexWAN module. Step 1 Screw To remove the port adapter, remove the screw that secures the port adapter (or blank port adapter). (See A.
Chapter 3 Removing and Installing Port Adapters Port Adapter Removal and Installation Cisco 7200 Series—Removing and Installing a Port Adapter Step 1 Port adapter lever (locked position) To remove the port adapter, place the port adapter lever in the unlocked position. (See A.) The port adapter lever remains in the unlocked position.
Chapter 3 Removing and Installing Port Adapters Port Adapter Removal and Installation Cisco 7301 Router—Removing and Installing a Port Adapter Step 1 Use an ESD wrist strap to ground yourself to the router. Step 2 To remove a port adapter, use a Phillips screwdriver to turn the screw holding the port adapter latch. The screw should be loose enough to allow the latch to rotate to an unlocked position. (See A.) The latch can rotate 360˚.
Chapter 3 Removing and Installing Port Adapters Port Adapter Removal and Installation Cisco 7304 PCI Port Adapter Carrier Card—Removing and Installing a Port Adapter You can install one single-width port adapter in a Cisco 7304 PCI Port Adapter Carrier Card. This section provides step-by-step instructions for removing and installing a port adapter in a Cisco 7304 PCI Port Adapter Carrier Card.
Chapter 3 Removing and Installing Port Adapters Port Adapter Removal and Installation Figure 3-2 illustrates how to remove and install a port adapter in a Cisco 7304 PCI Port Adapter Carrier Card.
Chapter 3 Removing and Installing Port Adapters Port Adapter Removal and Installation Cisco 7401ASR Router—Removing and Installing a Port Adapter Step 1 To remove the port adapter, use a number 2 Phillips screwdriver to loosen the screw on the port adapter latch. Rotate the port adapter latch until it clears the faceplate of the port adapter. (See A.) The latch can rotate 360˚.
Chapter 3 Removing and Installing Port Adapters Port Adapter Removal and Installation VIP—Removing and Installing a Port Adapter Note: You must first remove the VIP from the chassis before removing a port adapter from the VIP. Step 1 To remove the port adapter, remove the screw that secures the port adapter (or blank port adapter). (See A.
Chapter 3 Removing and Installing Port Adapters Connecting a Serial Cable Connecting a Serial Cable On a single one-port PA-T3+(=), you can use two 75-ohm coaxial cables (one for the receive port [RCVR] and one for the transmit [XMTR] port). You can use four 75-ohm coaxial cables on the two-port PA-2T3+(=). Cisco 75-ohm coaxial cables are available only from Cisco Systems. Caution You can attach only an EIA/TIA-612 or EIA/TIA-613 serial cable to the PA-T3+ installed in your router.
Chapter 3 Removing and Installing Port Adapters Connecting a Serial Cable Step 2 Attach the network ends of your two 75-ohm coaxial cables to your external T3 equipment as follows: • Attach the coaxial cable from the PA-T3+ XMTR port to the RX port on your external T3 equipment. • Attach the coaxial cable from the PA-T3+ RCVR port to the TX port on your external T3 equipment.
Chapter 3 Removing and Installing Port Adapters Connecting a Serial Cable PA-T3+ Serial Port Adapter Installation and Configuration 3-14 OL-3505-03
C H A P T E R 4 Configuring the PA-T3+ To continue your PA-T3+ port adapter installation, you must configure the serial interfaces. The instructions that follow apply to all supported platforms. Minor differences between the platforms—with Cisco IOS software commands—are noted.
Chapter 4 Configuring the PA-T3+ Configuring the Interfaces Configuring the Interfaces After you verify that the new PA-T3+ is installed correctly (the enabled LED goes on), use the privileged-level configure command to configure the new interfaces.
Chapter 4 Configuring the PA-T3+ Configuring the Interfaces Follow these steps to shut down an interface: Step 1 Enter the privileged level of the EXEC command interpreter (also called enable mode). (See the “Using the EXEC Command Interpreter” section on page 4-1 for instructions.
Chapter 4 Configuring the PA-T3+ Configuring the Interfaces Table 4-1 Syntax of the shutdown Command (continued) Platform Command Example Cisco 7401ASR router interface, followed by the type (serial) and slot/port (port-adapter-slot-number/ interface-port-number) The example is for the 0 interface and interface 1 on a port adapter in slot 1.
Chapter 4 Configuring the PA-T3+ Configuring the Interfaces Table 4-2 Examples of the show interfaces serial Command Platform Command Example Catalyst 6000 family FlexWAN module show interfaces serial, followed in Catalyst 6000 family switches by mod_num/bay/port (module-slot-number/ port-adapter-bay-number/ interface-port-number) The example is for interface 0 on a port adapter in bay 0 of a FlexWAN module in module slot 3.
Chapter 4 Configuring the PA-T3+ Configuring the Interfaces Table 4-2 Examples of the show interfaces serial Command (continued) Platform Command Example Cisco 7401ASR router show interfaces serial, followed by slot/port (port-adapter-slot-number/ interface-port-number) The example is for interface 0 on a port adapter in port adapter slot 1.
Chapter 4 Configuring the PA-T3+ Configuring the Interfaces Step 1 Enter configuration mode and specify that the console terminal is the source of the configuration subcommands, as follows: Router# configure terminal Enter configuration commands, one per line. End with CNTL/Z. Router(config)# Step 2 Table 4-3 Specify the first interface to configure by entering the interface serial subcommand, followed by the interface address of the interface you plan to configure.
Chapter 4 Configuring the PA-T3+ Configuring the Interfaces Step 5 Reenable the interfaces using the no shutdown command. (See the “Shutting Down an Interface” section on page 4-2.) Step 6 Configure all additional port adapter interfaces as required. Step 7 After including all of the configuration subcommands to complete your configuration, press Ctrl-Z—hold down the Control key while you press Z—or enter end or exit to exit configuration mode and return to the EXEC command interpreter prompt.
Chapter 4 Configuring the PA-T3+ Configuring the Interfaces Table 4-4 Clock Rate Configuration Commands (continued) Purpose Command Change the clock signal no invert-txc back to its original phase. Example Additional Information The example sets the transmit clock signal for a serial interface back to its original phase. “Configuring Cyclic Redundancy Checks” Router(config)# interface serial 3/0 Router(config-if)# no invert-txc Invert the data signal.
Chapter 4 Configuring the PA-T3+ Configuring the Interfaces Nonstandard clock rates are rounded (if necessary) to the nearest clock rate that the hardware can support. Set a nonstandard clock rate for an interface using the clock rate subcommand. Before you can assign a nonstandard clock rate, you must use the interface serial command (followed by the interface address of the interface) to select the interface to which you want to assign the nonstandard clock rate value.
Chapter 4 Configuring the PA-T3+ Configuring the Interfaces Note Invert data only on the PA-T3+ interface or on the CSU/DSU; inverting both cancels out both data inversions. Configuring NRZI Format Table 4-5 summarizes NRZI format commands. For more information, see the remainder of this section. Table 4-5 NRZI Format Commands Purpose Command Example Further Information Enable NRZI encoding.
Chapter 4 Configuring the PA-T3+ Configuring the Interfaces The preceding command examples apply to all systems in which the PA-T3+ is supported. Use the no nrzi-encoding command to disable NRZI encoding. When you have finished, press Ctrl-Z—hold down the Control key while you press Z—or enter end or exit to exit configuration mode and return to the EXEC command interpreter prompt. Then write the new configuration to NVRAM using the copy running-config startup-config command.
Chapter 4 Configuring the PA-T3+ Configuring Half-Duplex and Binary Synchronous Communications in Cisco 7200 Series Routers For command descriptions, refer to the Configuration Fundamentals Configuration Guide publication. For more information, see the “Obtaining Documentation” section on page x and the.“Obtaining Technical Assistance” section on page xi.
Chapter 4 Configuring the PA-T3+ Configuring Half-Duplex and Binary Synchronous Communications in Cisco 7200 Series Routers Step 2 Specify the interface to configure for controlled-carrier mode using the interface serial subcommand (followed by the interface address of the interface) and then enter the half-duplex controlled-carrier subcommand.
Chapter 4 Configuring the PA-T3+ Configuring Half-Duplex and Binary Synchronous Communications in Cisco 7200 Series Routers Step 5 Write the new configuration to NVRAM as follows: Router# copy running-config startup-config [OK] Router# This completes the procedure for configuring controlled-carrier mode on an EIA/TIA-232 interface.
Chapter 4 Configuring the PA-T3+ Checking the Configuration Enabling T3+ Scrambling In interface configuration mode, enable T3+ scrambling by entering the scramble configuration subcommand, as in the following example: router(config-if)# scramble Use the no form of this command to restore the default value, disabled. Note The local port configuration must match the remote port configuration. For example, if you enable scrambling on the local port, you must do the same on the remote port.
Chapter 4 Configuring the PA-T3+ Checking the Configuration Using show Commands to Verify the New Interface Status Table 4-8 demonstrates how you can use the show commands to verify that new interfaces are configured and operating correctly and that the PA-T3+ appears in them correctly. Sample displays of the output of selected show commands appear in the sections that follow.
Chapter 4 Configuring the PA-T3+ Checking the Configuration Table 4-8 Using show Commands (continued) Command Function Example show protocols Displays protocols configured for the entire system and for specific interfaces Router# show protocols show running-config Displays the running configuration file Router# show running-config show startup-config Displays the configuration stored in NVRAM Router# show startup-config If an interface is shut down and you configured it as up, or if the dis
Chapter 4 Configuring the PA-T3+ Checking the Configuration Processor board ID SAD03457061 R5000 CPU at 200Mhz, Implementation 35, Rev 2.1, 512KB L2 Cache Last reset from power-on Channelized E1, Version 1.0. Bridging software. X.25 software, Version 3.0.0. SuperLAT software (copyright 1990 by Meridian Technology Corp). TN3270 Emulation software. Primary Rate ISDN software, Version 1.1. 6 FlexWAN controllers (13 Serial)(8 E1)(8 T1)(2 HSSI)(2 ATM)(1 Channelized T3)(1 Channelized E3)(2 POS).
Chapter 4 Configuring the PA-T3+ Checking the Configuration Cisco 7401ASR Routers Following is an example of the show version command from a Cisco 7401ASR router with the PA-T3+: Router# show version Cisco Internetwork Operating System Software IOS (tm) 7401ASR Software (C7401ASR-J-M), Released Version 11.1(24)CC FIB_branch Synced to mainline version:11.1(21.2)CA Copyright (c) 1986-1998 by cisco Systems, Inc.
Chapter 4 Configuring the PA-T3+ Checking the Configuration 2 VIP2 R5K controllers (2 Serial)(2 HSSI). 6 Ethernet/IEEE 802.3 interfaces. 6 Serial network interfaces. 2 HSSI network interfaces. 123K bytes of non-volatile configuration memory. 20480K bytes of Flash PCMCIA card at slot 0 (Sector size 128K). 20480K bytes of Flash PCMCIA card at slot 1 (Sector size 128K). 8192K bytes of Flash internal SIMM (Sector size 256K).
Chapter 4 Configuring the PA-T3+ Checking the Configuration EEPROM contents (hex): 0x20:01 CB FF FF FF FF FF FF FF FF FF FF FF FF FF FF 0x30:FF FF FF FF FF FF FF FF FF FF FF FF FF FF FF FF Cisco 7401ASR Routers Following is an example of the show diag slot command that shows PA-T3+ in port adapter slot 1 of a Cisco 7401ASR router: Router# show diag 1 Slot 1: T3+ PA port adapter, 1 port Port adapter is analyzed Port adapter insertion time 2d14h ago Hardware revision 255.
Chapter 4 Configuring the PA-T3+ Checking the Configuration Using the show interfaces Command The show interfaces command displays status information (including the physical slot and interface address) for the interfaces you specify. The following examples show output for some of the supported platforms; all of the examples specify serial interfaces.
Chapter 4 Configuring the PA-T3+ Checking the Configuration Cisco 7401ASR Routers Following is an example of the show interfaces command for Cisco 7401ASR routers. In this example, the serial two interfaces (0 to 1) are on a port adapter in port adapter slot 1; also, most of the status information for each interface is omitted. (Interfaces are administratively shut down until you enable them.
Chapter 4 Configuring the PA-T3+ Checking the Configuration returned before the specified timeout is displayed as a period (.). A series of exclamation points (!!!!!) indicates a good connection; a series of periods (.....) or the messages [timed out] or [failed] indicate a bad connection. Following is an example of a successful ping command to a remote server with the address 10.0.0.10: Router# ping 10.0.0.10 Type escape sequence to abort. Sending 5, 100-byte ICMP Echoes to 10.0.0.
Chapter 4 Configuring the PA-T3+ Checking the Configuration Table 4-9 Using loopback Commands Command Function Example loopback network line Sets the interface into network line loopback mode. Network line loopback loops the data back toward the network (before the framer). Router(config)# interface serial 10/0/0 router(config-if)# loopback network line loopback network payload Sets the interface into network payload loopback mode.