
Operating instructions


132 Cisco Systems Intelligent Gigabit Ethernet Switch Module
Note that the choice to use more than one default gateway (for example, one on each
VLAN) is up to the user. See the discussion about default gateways on multihomed
systems in Appendix A, “Hints and tips” on page 227.
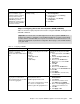
Step-by-step instructions to configure BladeServer1
Table 7-6 shows the step-by-step instructions to configure BladeServer1.
Table 7-6 Configuring BladeServer1 for 802.1Q trunks with multiple VLANs
Description and comments On BladeServer1
BASP using VLANs on both Ethernet ports
Step 4.1.1:
Launch BASP software.
This step assumes the desired software is
already installed.
Click Start → Programs → Broadcom → Broadcom Advanced
Control Suite.
This assumes that the software used a default installation. You can also
launch this software through an icon in the lower-right corner of the
window near the clock (move your cursor until you find the icon labeled
“Control Suite”) or by an icon available in Control Panel.
Step 4.1.2:
Create and name two teams,
each containing a single interface
.
Note that this process might seem as though
you are configuring for SLB. This is not the
case, because we will only have a single
NIC in each team, and we are only building
the teams to assign VLANs (thus turning the
interfaces into 802.1Q trunk interfaces).
1. Click Tools → Create a Team on the toolbar.
2. Enter ToCIGESM1 in the name field and click Next.
Note: Leave the Team Type with the default value (Smart Load
Balance and Fail Over).
3. Select the top NIC on the left side of the window, and click the top
right pointing arrow to add this NIC to the Load Balance Members.
4. Click Finish.
Repeat step 4.1.2 for the second NIC, naming the Team ToCIGESM2.
Step 4.1.3a:
Create desired VLANs on Team
CIGESM1
.
Create and name VLANs 10 and 15 on the
team going to CIGESM1.
1. Click Tools → Configure a Team on the toolbar.
2. Select ToCIGESM1 and click OK.
3. Click the Add VLAN button on right side of window.
4. In the VLAN ID field, enter 10.
5. In the VLAN Name field, enter VLAN10-WEB.
Note that the names should be descriptive but can be anything you
prefer. Also note that you want to leave the box labeled Untagged
VLAN cleared.
6. Click OK to create this VLAN.
Repeat step 4.1.3a for the second VLAN on this team. Set the VLAN ID
to 15 and name it VLAN15-USER.
Step 4.1.3b:
Create desired VLANs on Team
CIGESM2
.
Create and name VLANs 20 and 25 on the
team going to CIGESM2.
1. Click Tools → Configure a Team on the toolbar.
2. Select ToCIGESM2 and click OK.
3. Click the Add VLAN button on right side of window.
4. In the VLAN ID field, enter 20.
5. In the VLAN Name field, enter VLAN20-APPS.
Note that the names should be descriptive but can be anything you
prefer. Also note that you want to leave the box labeled Untagged
VLAN cleared.
6. Click OK to create this VLAN.
Repeat step 4.1.3b for the second VLAN on this team. Set the VLAN ID
to 25 and name it VLAN25-BACKUP.