
User guide

PTP 800 Series User Guide Task 15: Connecting link to the network
phn-2513_004v000 (Oct 2012)
6-115
6
For a 1+1 Hot Standby link, re-enable automatic fault protection switching by
setting the Fault Protection Switching attribute to ‘Enabled’, as described in
Configuring 1+1 Hot Standby links on page 6-54.
Repeat for the other end of the link.
7
Check that the wireless interface is enabled at both ends, as described in
Enabling wireless transmission on page 7-32.
For a 1+1 Hot Standby link, check that both units are enabled at each end.
8
Select menu option Home and check that there are no alarms on any unit. For
more information, see Managing alarms on page 7-15.
Setting the real-time clock
The clock supplies accurate date and time information to the CMU. It can be set to run
with or without a connection to a network time server (SNTP):
• In the absence of an SNTP server connection, set the clock to run manually. The clock
is battery backed and will continue to operate for several days after the CMU is
switched off.
• If an SNTP server connection is available, set the clock to synchronize with the server
time at regular intervals.
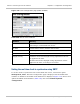
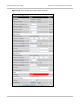
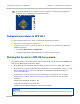
Setting the real-time clock manually
To set the CMU clock to keep time without connecting to a networked time server, select
menu option Management, Time. The Time Configuration page is displayed. Set the
SNTP State attribute to ‘Disabled’: the manual clock attributes are displayed (Figure 175).
Review and update the manual clock attributes (Table 248), then select Submit Updated
Configuration.