
User guide


Task 2: Configuring IP and Ethernet interfaces Chapter 6: Configuration and alignment
6-10
phn-2513_004v000 (Oct 2012)
Configuring the IP interface and management mode
The IP interface allows users to connect to the PTP 800 web interface, either from a locally
connected computer or from a management network.
Before setting Management Mode to ‘Out-of-Band’ or ‘In-Band’, configure the local and
remote CMUs to have different IP addresses, otherwise the management agent will not
be able to distinguish the two CMUs.
Similarly for a 1+1 Hot Standby link, configure all four CMUs to have different IP
addresses so that the active and inactive units may be distinguished as well as the local
and remote CMUs.
Forcing Ethernet configuration is a last resort. Select this option only when problems are
experienced with auto-negotiation.
To configure the Ethernet link to run at a fixed speed and duplex, leave Ethernet Auto
Negotiation set to ‘Enabled’ and set Auto Neg Advertisement to the required speed.
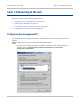
To configure the IP interface, proceed as follows:
1
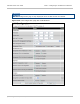
Select menu option System, Configuration, LAN Configuration. The LAN
Configuration page is displayed (Figure 116).
2
Review and update the IP interface attributes (Table 221).
3
If Management Mode has been set to ‘Out-of-Band Local’ or ‘Out-of-Band’,
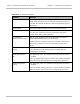
review and update the management port attributes (Table 222).
4
Review and update the data port attributes (Table 223).
5
Review and update the bridging attributes (Table 224).
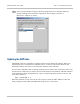
6
Select Submit Updated System Configuration. The Confirm LAN configuration
page is displayed (Figure 117).
7
Select Confirm Changes.
If the IP address is updated, then selecting Submit Updated System Configuration
will change the IP address and communication between the management PC and the
CMU will be terminated. To continue configuration, re-connect to the new IP address as
described in Reconnecting to the management PC on page 6-19. In case of error see
Resetting IP and Ethernet configuration to factory defaults on page 7-75.