
User guide


PTP 800 Series User Guide Replacing IRFU components
phn-2513_004v000 (Oct 2012)
5-105
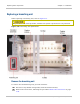
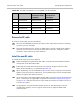
Table 220 RF cable connections (1+1 Tx MHSB / Rx SD example)
# Part number SMA cable
connector from
(angled)
SMA cable
connector to
(straight)
1 30009399001 Transceiver A Rx Filter A
2 30009399004 Tx Filter A RF Switch
3 30009399005 Transceiver A RF Switch
4 30009399006 Transceiver B RF Switch
5 30009399001 Transceiver B Rx Filter B
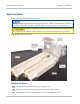
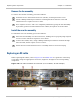
Remove the RF cable
To remove an RF cable, proceed as follows:
1
Note the Part Number printed on the label of the cable before removal, referring
to Table 220 as an example.
2
Using the Standard torque wrench or SMA torque wrench w/right-angle adaptor,
unscrew each connector’s end nut for about three 1/4 turns, enough to reduce
resistance, then continue by hand until free.
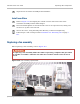
Install the new RF cable
To install an RF cable, proceed as follows:
1
Before installing the replacement RF cable, verify that its Part Number matches
exactly that of the discarded cable.
2
Fastening each cable-end nut by hand, start with the angled connector, then
follow by the straight one, as identified in Table 220.
3
Space permitting, use the Standard torque wrench set to 0.1 kg•m (9.0 lb-inch) to
tighten each connector nut. Otherwise, use the SMA torque wrench w/right-angle
adaptor to tighten the SMA connectors.
4
As an alternative, first hand-tighten the RF cable connector nuts to the transceiver
ports – referring to the applicable configuration from IRFU configuration options
on page 1-20 – slide the transceiver in the shelf, then fasten its Captive screws (2)
to secure it in place.
5
As appropriate, use the Standard torque wrench or the SMA torque wrench
w/right-angle adaptor, set to 0.1 kg•m (9.0 lb-inch), to tighten all RF cable
connector nuts.