
Programming instructions

48
3300 ICP Technician’s Handbook
To install a DSU:
1. Unpack and position the DSU node.
2. Check the card layout (see page 48).
3. Connect the fiber cable to the node (see page 49).
4. Install the interface assemblies (see page 49).
5. Install the DSU cards (see page 50).
Unpack and Position the DSU Node
To unpack and position the DSU node:
1. Open the DSU node carton.
2. Remove the plastic bag from the top and sides of the cabinet. Lift the
DSU node out of the carton.
3. Check the node and attached equipment for damages. Repack and
return any damaged equipment.
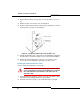
4. Position the node.
5. Remove the DSU node front panel.
Check the Card Layout
A DSU node is shipped with two fiber interface modules (FIMs) installed.
If FIM cards were not in the node see page 151 for installation instructions.
Each DSU node has one or two FIMs, depending on the number and
location of DSU cards in the node. The FIM in the bottom of slot 1 provides
communications with the control node for the DSU cards in slots 2 and 3,
and the FIM in the bottom of slot 6 provides communications for the DSU
cards in slots 4 and 5. Install and cable the FIMs before you install any
cards in the DSU node. Check the DSU node card layout on page 290 to
ensure that you have the parts that you need to complete the installation.
CAUTION: Do not open or unpack any printed circuit board
cartons at this time.
CAUTION: Ensure that you use the Cabinet Stacking
Brackets if you want to stack cabinets on top of each other.
Stacking cabinets without these brackets could result in
damage to the equipment or injury.