
Programming instructions


20
3300 ICP Technician’s Handbook
5. Connect the power and ribbon cables to the corresponding connectors
on the hard drive.
6. Insert the hard drive.
7. Secure the hard drive to the controller using the screws provided.
System ID Module
To install a SysID module in a LX/MX/100/250/700-user controller:
1. Remove the System ID module from its packaging.
2. Remove the protective cover from the System ID module’s connector.
3. Remove the controller cover (see page 99 or page 100).
4. Install the module connector in its mate on the controller.
- 100-user controller: behind slot 2
- MX controller: behind slot 4
- LX and 250/700-User controller: between slots 1 and 8.
5. Secure the System ID module using the screw provided.
Other Controller Components
Refer to “Upgrades and FRUs” on page 95 for instructions to install
additional controller components.
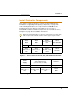
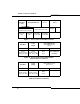
Mounting the MXe Controller
To rack-mount the MXe:
1. Attach the mounting brackets to the MXe using the flat head screws
provided.
2. Loosely install one frame mounting screw on each side of the frame:
- in the bottom hole position of the space that the MXe will occupy.
Tip: The CX/CXi/MXe controllers are shipped with the i-Button installed. If
you receive a CX/CXi/MXe and the i-Button is not installed, refer to page 133
for installation instructions.
Tip: Mount the MXe in a rack without the hard drives and power supplies to
reduce the weight.