
Programming instructions

149
Upgrades and FRUs
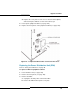
g. Tighten the door screws on the back of the filter kit to hold the FIM
cables securely in place.
7. Install up to 12 peripheral interface cards in slots 1 through 12 of the
master cabinet (as required for your system).
8. Cable the master cabinet to the MDF, and power it up to ensure that it
works properly.
9. Attach the cabinet interconnect cable to the EMI filter kit on each
cabinet.
10. Power up the slave cabinet to ensure that it works properly.
11. Replace the front panels on both cabinets.
Installing an Expanded Peripheral Cabinet
The expanded peripheral cabinet II consists of the following components:
• Peripheral node II - peripheral cabinet II, power converter, peripheral
switch controller II card, fiber interface module.
• Peripheral expansion node II - peripheral cabinet II, power converter,
peripheral interconnect cards (2), EMI filter kits (2), cabinet
interconnect cable.
Review “Safety Considerations” on page 98 before installing an expanded
peripheral cabinet.
To install an expanded peripheral cabinet:
1. Unpack, position, and ground both cabinets (see page 40).
2. Remove the front panels from both cabinets (see page 142).
- The master cabinet includes a power converter in slots 13 to 15, a
peripheral switch controller (PSC) in slot 16, and a fiber interface
module (FIM) in slot 17.
- The slave cabinet includes a power converter in slots 13 to 15, a
peripheral interconnect card in slot 16, and an additional peripheral
interconnect card with the package.
3. Install the additional peripheral interconnect card in slot 16B of the
master cabinet.
Tip: The peripheral expansion node II is not orderable. Instead, a peripheral
node II is ordered and converted to an expansion node by using the peripheral
cabinet expansion kit (see page 147).