
Programming instructions

147
Upgrades and FRUs
Replacing the Fiber Interface Module (FIM)
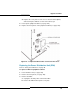
To replace a FIM in a peripheral cabinet:
1. Power down the unit and remove the front panels (see page 142).
2. Attach the anti-static strap to your wrist.
3. If you need more room, remove the power converter and the
peripheral switch controller (PSC).
4. Disconnect the fiber cables from the FIM.
- Place dust caps on the cable and on the FIM connectors.
5. Pull the FIM out gently from slot 17, unplugging it from the backplane.
6. Unpack the new FIM, and inspect it to ensure that it is not damaged.
7. Slide the new FIM into the bottom of slot 17 until it connects with the
backplane firmly.
8. Fasten the new FIM in place with the two screws provided or the latch
on the card guides.
9. Attach the FIM cable by following the steps in Connect the Fiber Optic
Cable (see page 42).
10. If the PSC and power converter were removed, replace them.
11. Power up the unit and replace the front panels (see page 142).
Expanding a Peripheral Cabinet II
To convert a peripheral cabinet II to an expanded peripheral
cabinet II:
1. Unpack, position, and ground the new cabinet. This cabinet will be
used as the slave cabinet.
2. Unpack the peripheral node expansion Kit. It contains 2 interconnect
cards, 1 interconnect cable, and 2 EMI filter kits.
3. Remove the front panel from the slave cabinet.
WARNING:POWER MUST NOT BE APPLIED TO THE
PERIPHERAL CABINET WHILE THE FIM IS REPLACED.
Tip: A Peripheral Expansion Node II is no longer an orderable item. Instead,
a Peripheral Node II is ordered and converted to an Expansion Node by using
the Peripheral Node Expansion Kit.