
Programming instructions

139
Upgrades and FRUs
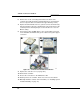
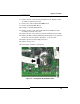
11. Set the main board on the chassis and attach to the chassis with the
captive screw.
12. Attach the cables to the main board.
13. Connect the ribbon cable to the interconnect card or RAID controller.
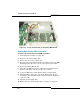
14. Replace the cover and reconnect the cables to the controller.
15. Power up the controller (see page 22).
Cooling Fan (MXe)
To replace the cooling fan in an MXe:
1. Power down the controller.
2. Remove the controller cover (see page 101).
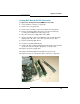
3. Remove the two fan screws above the edge of the controller chassis.
4. Disconnect the cable and lift out the fan unit.
5. Set the new fan unit in place.
6. Secure the unit with two screws and connect the cable.
7. Replace the top cover.
8. Power up the controller (see page 22).
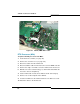
Power Supply Unit (MXe)
To replace a power supply unit in a single power supply MXe:
1. Set the AC power switch to OFF.
2. Remove the power cord from the AC receptacle on the power supply.
3. Loosen the thumb screw on the power supply.
4. Remove the defective power supply unit from the rear of the controller.
5. Slide the new power supply unit into the controller.
6. Push to seat the power supply into the system power connector.
7. Secure the thumb screw and connect the power cord.
8. Set the AC power switch to ON.