
Programming instructions

132
3300 ICP Technician’s Handbook
6. Remove the screws connecting the bracket to the back of the
controller, then slide the bracket forward and remove it. (Removal is
unnecessary if the drive is installed in the upper bracket position).
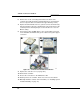
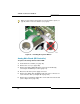
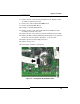
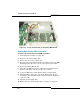
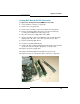
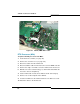
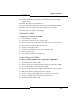
7. Replace the drive with the new one (1) and secure it to the bracket (2).
(If the bracket was removed, re-install it and secure it to the back of the
controller). Ensure that the jumpers on the new drive are set to the
Master setting.
8. Connect the power and IDE cables to the corresponding connectors
on the hard drive and main board (3). The cables are keyed for proper
connection.
9. Replace the controller cover (see page 101).
10. Remount the controller.
11. Restore the connections to the Maintenance PC.
12. Return power to the controller, but do not connect to the network.
13. Manually install the software on the hard drive (see “Installing System
Software Manually” on page 77).
Figure 20: CX Controller Hard Drive Installation