
Programming instructions

131
Upgrades and FRUs
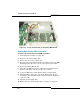
- Slide the first hard drive into the HD1 position. DO NOT INSTALL
the second hard drive at this time.
6. Push to seat the first hard drive into the hard drive back plane.
7. Tighten the thumb screw.
8. Return power to the controller, but do not connect to the network.
9. Manually install the software on the hard drive (see “Installing System
Software Manually” on page 77).
10. Reconnect the controller to the network.
11. Replace the second old hard drive with the second new hard drive in
the hard drive carrier with the four screws.
12. Slide the second hard drive into the HD2 position.
13. Push to seat the hard drive into the hard drive back plane.
14. Tighten the thumb screw.
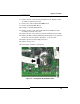
15. To copy data onto the new drive, press the HD2 mirror control button
for the new hard disk for 5 to 10 seconds.
- Release the button when the Access LED starts flashing twice per
second.
- The rebuild process is indicated by the Access LED solid green and
the Fault LED flashing green.
16. The rebuild is complete when the Fault LED is off (approximately 20G
per hour).
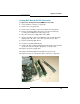
CX/CXi Hard Drive
To replace the hard drive in a CX or CXi:
1. If possible, back up your database (or locate the most recent backup).
2. Power down the controller (see page 99).
3. Disconnect all cables.
4. Remove the controller cover (see page 101).
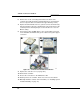
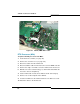
5. Unplug the ribbon cable and the power cable from the old hard drive.
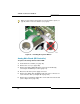
Tip: Use this procedure only to replace a controller hard drive in a system
that’s already installed. To install a hard drive in a new system, see “Hard
Drive” on page 19.