
Programming instructions

130
3300 ICP Technician’s Handbook
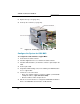
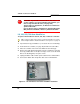
6. Install the new hard drive in the hard drive carrier with the four screws.
7. Slide the hard drive into the controller.
8. Push to seat the hard drive into the hard drive back plane.
9. Tighten the thumb screw.
10. To copy data onto the new drive, press the mirror control button for the
new hard disk for 5 to 10 seconds.
- Release the button when the Access LED starts flashing twice per
second.
- The rebuild process is indicated by the Access LED solid green and
the Fault LED flashing green.
- The rebuild is complete when the Fault LED is off (approximately
two hours).
MXe Hard Drive, Both Redundant Drives
Use this procedure when both drives have failed or when you need to
replace both drives because replacement hard drive part number is
different from that of the defective hard drive.
To replace both hard drives in a redundant hard drive MXe:
1. Ensure that you have a database backup.
2. Power down the controller (see page 99).
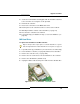
3. Loosen the captive screws and slide the hard drives from the hard
drive carrier.
4. Clear the sockets (refer to Knowledge Base Article 06-2806-00012).
5. Replace the old hard drive with the new hard drive, in the hard drive
carrier, with the four screws.
CAUTION: Both hard drives must have the same part
number.
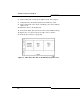
CAUTION: You must install only the first hard drive before
you boot the system.
After the system is fully booted, slide the second hard drive
into the HD2 position.