
Programming instructions

129
Upgrades and FRUs
8. Manually install the software on the hard drive (see “Installing System
Software Manually” on page 77).
9. Reconnect the controller to the network.
10. If you backed up your database in Step 1, restore the database (see
“Restore a Database” on page 63).
MXe Hard Drive, Redundant
Refer to “MXe Hard Drive, Both Redundant Drives” on page 130 when you
have to replace both hard drives under the following conditions:
• both of the hard drives have failed OR
• the replacement hard drive part number is different from that of the
defective hard drive.
To replace a hard drive in a redundant hard drive MXe:
1. If the hard drive is already off-line (normally or faulted) go to step 4.
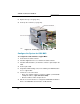
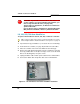
2. Using a small pointed object (paper clip), press the mirror control (ctrl)
button, for less than five seconds, of the hard drive to be removed.
- Release the button when the Access LED starts flashing once per
second.
- Hard drive is off-line when the Access LED is off and the fault LED
is orange.
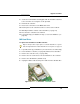
3. Release the retaining screw securing the hard drive carrier to the
controller.
4. Slide the defective hard drive out of the hard drive carrier.
5. Remove the four screws securing the hard drive to the hard drive
carrier.
CAUTION: Both hard drives must have the same part
number.
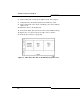
Tip: Refer to Table 96: RAID Fault and Access LEDs p.(337) for a complete
description of LED activity.
Tip: We recommend that you perform a replacement with rebuild outside of
business hours.