
Programming instructions

127
Upgrades and FRUs
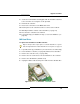
7. Secure the new hard drive backing plate with the hard drive attached,
to the controller cover using the screws provided.
8. Remount the controller.
9. Restore the connections to the Maintenance PC.
10. Return power to the controller, but do not connect to the network.
11. Manually install the software on the hard drive (see page 77).
12. Reconnect the controller to the network.
13. If you backed up your database in Step 1, restore the database (see
page 63).
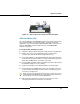
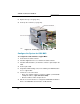
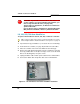
MX Hard Drive
To replace the hard drive in an MX controller:
1. If possible, back up your database (or locate the most recent backup).
2. Power down the controller (see page 99) and disconnect all cables.
3. Remove the controller cover (see page 100).
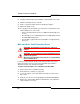
4. Remove the four screws that secure the hard drive to the controller.
5. Remove the old hard drive (behind slot 4).
6. Unplug the ribbon cable and the power cable from the old hard drive.
Tip: Use this procedure only to replace a controller hard drive in a system
that’s already installed. To install a hard drive in a new system, see page 19.
Figure 19: MX Controller Hard Drive Installation