
Programming instructions
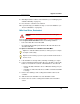

126
3300 ICP Technician’s Handbook
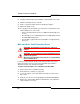
LX, 100, 250, 700-User Hard Drive
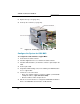
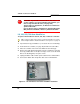
To replace the hard drive in the LX, 100, 250, or 700-user controller:
1. If possible, back up your database (or locate the most recent backup).
2. Power down the controller (see page 99) and disconnect all cables.
3. Place the controller on the work area with the bottom facing up.
4. Remove the hard drive backing plate from the controller by removing
the six (6) small border screws (the four large screws secure the hard
drive to the backing plate). Keep the screws.
5. Unplug the ribbon cable and the power cable from the old hard drive.
6. Connect the ribbon cable and power cable to the new hard drive.
CAUTION: If you install a new hard drive, with Release 6.0
or later software, in a system running older software, you
must change the RTC file name (see page 300).
The file name for all platforms, for Release 6.0 and later is:
/partition1/Rtc8260.
Prior to Release 6.0: LX, 250/700-user: /partition1/Rtc8260;
MX: /partition1/Lite200UP; 100-user: /partition1/Lite8260
Tip: Use this procedure only to replace a controller hard drive in a system
that’s already installed. To install a hard drive in a new system, see page 19.
Figure 18: LX and 700-User Controller Hard Drive Installation