
Programming instructions

123
Upgrades and FRUs
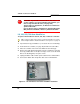
Redundant Power Supply (MXe)
To add a redundant power supply in an MXe:
1. Remove the power supply unit blanking panel.
2. Slide the new power supply unit into the power supply carrier on the
rear of the controller.
3. Push to seat the power supply into the power supply back plane.
4. Secure the thumb screw and connect the power cord.
5. Set the AC power switch to ON. AC and DC LEDs will illuminate.
To replace a power supply:
1. Set the AC power switch to OFF.
2. Remove the power cord from the AC receptacle on the power supply.
3. Loosen the thumb screw on the power supply.
4. Slide the power supply unit out of the power supply carrier on the rear
of the controller.
5. Continue with the “To add a redundant power supply in an MXe:”
procedure, above, beginning with step 2.
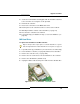
E2T Processor (MXe)
To add an E2T processor in an MXe:
1. Power down the controller (see page 99).
2. Remove the controller cover (see page 101).
3. Disconnect cables from the main board.
4. Disconnect ribbon cable from the interconnect card or RAID controller.
5. Remove the single captive screw that secures the main board to the
chassis.
6. With the rear of the controller facing you, slide main board towards the
front of the chassis and pull it up.
Tip: It is not necessary to power down the controller to add a power supply.
Tip: Refer to Engineering Guidelines to determine when a second processor
is necessary.