
Programming instructions

119
Upgrades and FRUs
After you install the APC, continue by installing the APC hard drive
(page 121) and configuring for 6000 MAS (page 122).
To install the APC in a CXi:
1. Remove the controller, hard drives, and APC from their packaging.
2. Remove the top cover of the controller (see page 101).
3. Remove the Stratum Clock module if installed.
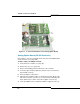
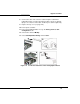
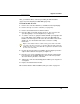
4. Place the APC on the main board connectors. The connectors are
spaced irregularly to assist in alignment (see Figure 13).
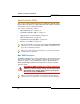
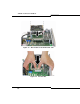
5. To seat the connectors, grasp the main board with your fingertips and
press down firmly on the middle of one side of the APC with your
thumbs as shown. Repeat for the other side of the APC next to the fan
(Figure 14). You should hear and feel the connectors seating
themselves.
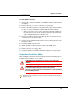
6. Prepare the heat spreader for installation by removing the protective
strips from the adhesive heat pads (see Figure 15).
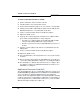
7. Place the four screws (supplied) in the heat spreader, and lower the
heat spreader onto the APC. Align the cutout on the heat spreader
above the memory modules on the APC.
8. Tighten the screws in an alternating pattern until they are snug. Do not
over-tighten.
9. Replace the Stratum Clock module.
10. Continue with the “APC Hard Drive (CXi)” procedure on page 121.
Tip: To ensure that the APC is seated securely, press down on the APC
over each of the four connectors, one at a time. Once the APC is properly
installed, the four corners of the APC will rest against the standoffs located
at each corner of the APC.