
Programming instructions

118
3300 ICP Technician’s Handbook
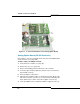
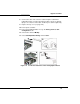
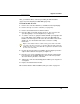
To install a redundant hard drive in an MXe:
1. Remove hard drive carriers from the controller.
2. Install hard drives onto the hard drive carriers.
3. Ensure that the hard drive jumpers are set to master (see page 256).
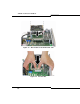
4. Slide the first hard drive, with installed software, into the HD1 position.
DO NOT INSTALL the second hard drive at this time.
5. Push to seat the hard drive into the hard drive back plane.
6. Tighten the thumb screw.
7. Power up the controller (page 22). The HD1 access LED should be
green and the activity LED flashes orange and green.
- The HD1 access LED should be green HD2 fault LED should be
orange and the activity LED flashes orange and green
- Once the system is booted, the activity LED will be green most of
the time.
8. After the system is fully booted, slide the second hard drive into the
HD2 position.
9. Push to seat the hard drive into the hard drive back plane.
10. Tighten the thumb screw.
11. Press the HD2 mirror control (ctrl) button for 5 to 10 seconds to mirror
the drives.
12. Release the mirror button when the fault LED flashes green twice per
second. The Activity LED will go solid green, occasionally flash amber.
13. The rebuild process will take more than two hours to complete. After
the rebuild is complete, the HD2 fault LED will be off and the access
LED will be on solid green.
Application Processor Card (CXi)
The optional Application Processor Card (APC) allows the system to host
the Mitel 6000 Managed Application Server (MAS) that can run 6040 Office
Server, Live Business Gateway, Mobile Extension, and Teleworker
Solution. Each of the applications will be released with guidelines defining
conditions, performance, and installation combinations. For information on
how to program and use software blades and services, refer to the 6000
MAS documentation at http://edocs.mitel.com.