
Programming instructions

117
Upgrades and FRUs
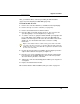
To add a RAID controller:
1. Remove the controller, hard drives, and RAID controller card from their
packaging.
2. Remove the top cover of the controller (see page 101).
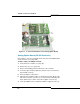
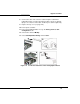
3. Remove the indented portion of the plastic bezel, above the hard drive
position, to expose the RAID controller LEDs and mirror buttons.
- At the rear of the cover, insert a sharp object through a LED hole.
Push the bezel cover out far enough to grasp the top and bottom
edges and pull that portion of the bezel off.
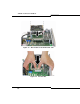
4. Remove the ribbon cable from the HD1 position on the interconnect
card and remove the power cable.
5. Remove the standard hard drive interconnect card from the top of the
hard drive carrier.
6. Install the RAID controller card.
7. Attach the ribbon cable and power cable to the RAID card.
8. Replace the top cover (page 101).
9. Continue with the “Redundant Hard Drive (MXe)” procedure, below.
Redundant Hard Drive (MXe)
After the RAID controller has been installed, perform the following steps to
install the two hard drives, one at a time.
CAUTION: Both hard drives must have the same part
number.
CAUTION: You must install only the first hard drive, with the
installed software, before you boot the system.
After the system is fully booted, slide the second hard drive
into the HD2 position.
Tip: We recommend that you perform a replacement with rebuild outside of
business hours.