
Programming instructions

109
Upgrades and FRUs
Adding or Replacing a DSP Module
To add or replace a DSP module:
1. Power down the controller (see page 99) and disconnect all cables.
2. Remove the controller cover (see page 99 or page 101).
3. Remove the DSP module from its packaging.
4. Remove a blank module cover if necessary. For installation in a rear
slot, internal site in the MXe, or Slot 3 in the CX and CXi controllers,
skip to Step 8. See the Figures on page 15 for slot locations.
5. If you are replacing a defective DSP, remove the screws and lock
washers and pull up on the module to remove it.
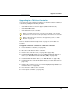
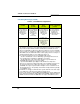
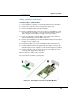
6. Remove the small PCB (or the defective DSP module) from the blank
module cover (1 in Figure 10).
7. Install the module cover on the new DSP module (2 in Figure 10).
8. Insert the DSP module in the appropriate slot, firmly seat it onto the
main board, and secure using the screws and lock washers provided.
9. Put the controller’s top cover back on, and secure it with its screws
(see page 100, page 100, or page 101).
10. Reconnect the cables to the controller.
11. Power up the controller (see page 22).
Figure 10: Attaching Cover Plate to the DSP Module