
Programming instructions

102
3300 ICP Technician’s Handbook
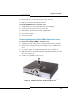
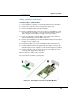
To install the CX/CXi and MXe controller cover:
1. Turn the controller until the front panel is facing forward.
2. Align the pins inside the cover with the corresponding slots on the
controller, and then, with the cover about half an inch from the back,
lower the cover to seat it.
3. Slide the cover toward the back of the controller as far as it will go.
4. Tighten the screw on the back panel.
5. Reinstall the controller into the rack (if applicable).
6. Reconnect all cables.
7. Power on the unit.
Upgrading to a 300 or 450 MHz Controller
If you have a 133 MHz controller, you can replace it with a 300 MHz
controller. You can replace a 700-User 300 MHz controller with 450 MHz
controller. 64 compression channels requires a minimum 300 MHz
controller.
To upgrade a 133 MHz controller to a 300 or 450 MHz controller:
1. Power down the old controller (see page 99).
2. Disconnect all cables from the old controller.
3. Move the hard drive from the old controller to the new controller (see
“Hard Drive Replacement Overview” on page 125).
4. Remove each controller’s cover (see page 99).
5. Move the System ID module from the old controller to the new
controller (see “System ID Module” on page 133).
6. Connect the cables to the new controller.
7. Power up the new controller.
WARNING:TO UPGRADE TO A 300 OR 450 MHZ CONTROLLER,
MOVE THE HARD DRIVE FROM THE OLD CONTROLLER TO
THE NEW CONTROLLER. MANUALLY INSTALL THE RELEASE
5.0 SOFTWARE (SEE "INSTALLING SYSTEM SOFTWARE
MANUALLY" ON PAGE 77) AND RESTORE THE DATABASE.