USER GUIDE Cisco Unified Communications Manager Express for Cisco Unified IP Phone 521G and 524G User Guide 1 Overview 2 Operating Your Phone 3 Phone Features Index 4 Cisco One-Year Limited Hardware Warranty Terms 1 Overview This guide provides operating instructions, and feature descriptions for the Cisco Unified IP Phone models 521G and 524G. The Cisco Unified IP Phone 521G has a single line and the 524G has four lines.
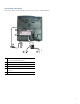
1 2 13 3 4 5 6 7 12 11 10 9 203241 8 Name Description 1 LCD screen Displays information such as line/call status, phone number, date, time, and soft key tabs. 2 4-way navigation pad and select (center) button Allows you to scroll through soft button features, and displays phone numbers from your Placed Calls, when phone is on-hook. Use select button to select an item that is highlighted on the screen. 3 Soft keys buttons Engages the functions displayed on the corresponding LCD tabs.
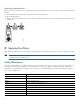
Connecting Your Phone This section shows and describes the connectors on your Cisco Unified IP phone.
Adjusting the Handset Rest When you connect your phone, you can adjust the handset rest so that the receiver does not slip out of the cradle. To adjust the handset: 1. Set the handset aside and pull the square plastic tab from the handset rest. 2. Rotate the tab halfway. 3. Slide the tab back into the handset rest. An extension protrudes from the top of the rotated tab. Return the handset to the handset rest.
Soft Key Function Delete Deletes selected number. Delchr Deletes a character. Dial Dials displayed number. DnD Enables Do-Not-Disturb feature. Down Decreases LCD screen contrast. EditDial Selects number and activates cursor for editing. EndCall Ends current call. Exit Exits from current selection. Flash Provides hookflash functionality for three-way calling and call waiting services provided by the PSTN or Centrex service.
• Hold and Resume a Call, 7 • Mute a Call, 7 • Manage Call Waiting, 8 • Retrieve Voice Messages, 8 • Adjust the Volume for the Current Call, 8 • Adjust the Ring Volume, 8 • Select the Ring Type, 8 • Adjust the Display Contrast, 9 • Divert Incoming Calls, 9 • Park a Call, 9 • Call-Blocking (Toll Bar) Override, 9 • View Multiple Calls, 10 • Transfer a Call, 10 • Cancel Transfer, 10 • Transfer to Voice Mail, 10 • Forward All Calls, 10 • Pick Up Calls, 11 • Place and Establish Conference Call, 11 • End a Confer
• Press Redial to dial the last number, or press the Navigation button (with the phone idle) to see your Placed Calls. • If you are placing a call while another call is active (using the same line), press the Hold button, and then press New Call and enter the number. • If you are dialing from the Setup, choose Call History and select Missed Calls, Received Calls, or Placed Calls. • If you are dialing on-hook, without a dial tone (predial), enter a number, then lift the handset go off-hook, press Dial, or .
Press to toggle Mute on, red light will light when active. Press to toggle Mute off. Manage Call Waiting If you are on a call when a second call comes in, you will hear a call-waiting tone and, or, see a flashing indicator light on the handset rest, depending on the configuration of your phone. To answer the new call on the same line, use the following method: 1. Use the Navigation button to select the call. 2. Press Answer to answer the call. The call on the other line is automatically put on hold.
Adjust the Display Contrast To adjust the contrast in your LCD Display, use the following method: 1. Press the Setup button. 2. Press 1 for Contrast, or use Select. 3. Use the Down or Up soft key to change the contrast. 4. Press Ok. 5. Press Save or Exit. 6. Press Ok to select your contrast setting. 7. Press Save to save the setting, or press Cancel to exit to the previous menu without changing the setting. 8. Press Exit to return to the main directory menu.
Transfer a Call To transfer a selected call to another number, use the following method: 1. During a call, press Trnsfr. The call is placed on hold. 2. Dial the number to which you want to transfer the call. 3. Press Trnsfr to complete the transfer or wait for the call to be answered. Speak to the transfer recipient. Then press the Trnsfr button or hang up the handset. 4. If the transfer fails, press EndCall then press Resume to return to the original call. Cancel Transfer 1.
• If the ringing telephone and your phone are in different pickup groups, dial the pickup group number where the phone is ringing to transfer call control to your phone. Place and Establish Conference Call To place a conference call, use the following method: 1. During a call, press Confrn to open a new line and put the first party on hold. 2. Place a call to another number. 3. When the call connects, press Confrn again to add the new party to the call.
4. Using the keypad, enter the last name or first name for the entry. When entering letters, select the appropriate number key of the letter you want, and press that key a number of times that equals the position of the target letter. For example, to enter a B, press the 2 key two times, and to enter a C, press the 2 key three times. Use the backspace (<<) soft key to make corrections while entering data. 5. Press Search to find your selection. 6.
Place a Call from Call History To place a call to a number in the call history list: 1. Use the Navigation button to scroll through the Call History list. 2. Use Select to select a phone number. The digits will appear on the phone display. To dial the number as it appears on the phone display: – Press Dial. To edit the number on the phone display before dialing: 1. Press EditDial to place the cursor at the beginning of the number on the phone display. 2. Use the keypad to edit the digits as needed.
3 Phone Features Index This section provides an alphabetical list of features for your Cisco Unified IP phone. Features supported in Smart Phone Control Protocol (SPCP) are marked as “Supported”. Table 1 Features supported in SPCP protocols.
4 Cisco One-Year Limited Hardware Warranty Terms There are special terms applicable to your hardware warranty and various services that you can use during the warranty period. Your formal Warranty Statement, including the warranties and license agreements applicable to Cisco software, is available on Cisco.com. Follow these steps to access and download the Cisco Information Packet and your warranty and license agreements from Cisco.com. 1. Launch your browser, and go to this URL: http://www.cisco.
To Receive a Return Materials Authorization (RMA) Number Contact the company from whom you purchased the product. If you purchased the product directly from Cisco, contact your Cisco Sales and Service Representative. Complete the information below, and keep it for reference.
Americas Headquarters Cisco Systems, Inc. 170 West Tasman Drive San Jose, CA 95134-1706 USA www.cisco.com Tel: 408 526-4000 800 553-NETS (6387) Fax: 408 527-0883 Asia Pacific Headquarters Cisco Systems, Inc. 168 Robinson Road #28-01 Capital Tower Singapore 068912 www.cisco.com Tel: +65 6317 7777 Fax: +65 6317 7799 Europe Headquarters Cisco Systems International BV Haarlerbergpark Haarlerbergweg 13-19 1101 CH Amsterdam The Netherlands www-europe.cisco.