
Installation Guide


CHAPTER
9-1
Cisco x90 Series Content Security Appliances Installation and Maintenance Guide
9
Cisco S390 Web Security Appliance
• Rear Panel Ports, page 9-1
• Using Status LEDs and Buttons for Maintenance, page 9-2
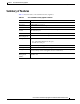
• Summary of Features, page 9-5
Rear Panel Ports
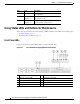
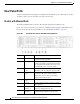
Figure 9-1 shows the rear panel ports of the Cisco S390 Web Security Appliance.
Figure 9-1 Rear Panel Ports of Cisco S390 Web Security Appliances
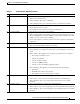
Item Port Description
1 Proxy port 1 Connect proxy port P1 to the network for both
incoming and outgoing traffic.
2 Proxy port 2 When both proxy ports P1 and P2 are enabled,
you must connect P1 to the internal network and
P2 to the Internet. P1 and P2 can connect to L4
switch, WCCP router, or network switch.
3 Traffic Monitor
port 1
Traffic monitor port T1 for Duplex Ethernet tap:
One cable for all incoming and outgoing traffic.
4 Traffic Monitor
port 2
Traffic monitor port for Simplex Ethernet tap:
One cable for all packets destined for the
internet (T1), and one cable for all packets
coming from the Internet (T2).
5 Remote Power
Cycle
Port that is used for Remote Power Cycle (RPC).