
User Guide


1-13
Cisco Advanced Web Security Reporting Installation, Setup, and User Guide
Chapter 1 Installation and Setup
Configure CWS Log Updates
Note Accessing online Help from the Add Log Subscription page brings up detailed information about
all settings.
Configure CWS Log Updates
Before You Begin
• Log into the Advanced Web Security Reporting application as admin.
Step 1 In the Advanced Web Security Reporting application:
• Choose Settings > Data inputs > Cisco CWS Logs.
Step 2 Click New.
Step 3 Provide a meaningful name for this data input.
Step 4 Provide the client_id, s3_key and s3_secret that have been provided from CWS. The client_id is the
bucket ID used in CWS.
Step 5 Click More settings check box and provide the time Interval in seconds at which CWS logs can be
pulled; default is 3600.
Step 6 Click Next.
Step 7 A success screen is displayed.
Note You can navigate to Settings > Data inputs > Cisco CWS Logs to confirm the new data input entry.
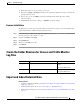
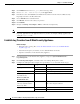
(Optional) Custom Fields Access only %XK (Adds a web reputation threat reason.)
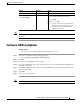
Retrieval Method
Select Syslog Push
Either Hostname: IP address or host name of the
Advanced Web Security Reporting host.
Protocol: TCP.
Facility: choose auth.
Note If connection between Advanced Web
Security Reporting and WSA is lost, logs
for that period are not available until
connection is restored.
Setting Log Type Value