
User Guide


1-9
Cisco Advanced Web Security Reporting Installation, Setup, and User Guide
Chapter 1 Installation and Setup
Create the Folder Structure for Access and Traffic Monitor Log Files
5. Ensure that indexes are reported to the correct pool:
a. Navigate to Settings > Licensing and find the “Pools Indexers Volume used today” row under the
appropriate license stack.
b. If necessary, you can click Edit to change the maximum daily volume allocation, and the
indexers assigned.
c. Click Cancel if you made no changes, or Submit if you made changes.
License Installation
To obtain licenses, please refer to the information provided when you placed your order. Follow these
steps to install Advanced Web Security Reporting license(s):
Step 1 Launch the Advanced Web Security Reporting application (enter http://<hostname>:8888 in a browser
window) and log in as the default
admin user.
Step 2 Navigate to Settings > Licensing.
Step 3 Click Add license.
Step 4 Browse to your XML license file.
Step 5 Click Install.
Create the Folder Structure for Access and Traffic Monitor
Log Files
Import and Index Historical Data
Before You Begin
• Complete configuration tasks listed in Install and Configure the Advanced Web Security Reporting
Application, page 1-4.
• Verify that field extractions are correct. See Chapter 3, “Field Extractions”.
• Know the folder structure. See Create the Folder Structure for Access and Traffic Monitor Log Files,
page 1-9.
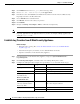
Log Default Path Variables
Traffic Monitor /$Input_base/wsa_hostname/trafmonlogs/ $Input_base=path of root FTP
folder
host_name=WSA device
Access /$Input_base/wsa_hostname/accesslogs/ $Input_base=deployment
host_name=WSA device