Cisco Advanced Web Security Reporting Installation, Setup, and User Guide Version 4.5 Published: June 22, 2015 Revised: December 11, 2015 Cisco Systems, Inc. www.cisco.com Cisco has more than 200 offices worldwide. Addresses, phone numbers, and fax numbers are listed on the Cisco website at www.cisco.com/go/offices.
THE SPECIFICATIONS AND INFORMATION REGARDING THE PRODUCTS IN THIS MANUAL ARE SUBJECT TO CHANGE WITHOUT NOTICE. ALL STATEMENTS, INFORMATION, AND RECOMMENDATIONS IN THIS MANUAL ARE BELIEVED TO BE ACCURATE BUT ARE PRESENTED WITHOUT WARRANTY OF ANY KIND, EXPRESS OR IMPLIED. USERS MUST TAKE FULL RESPONSIBILITY FOR THEIR APPLICATION OF ANY PRODUCTS.
CONTENTS CHAPTER 1 Installation and Setup 1-1 Introduction 1-1 What’s New in 4.
Contents Restrict Access to Department Reports by Role 1-15 Troubleshooting Department Membership Reporting 1-15 Set Up Scheduled PDF Reporting (Optional) 1-16 Configure Email Alerts 1-16 Schedule PDF Report Generation 1-16 Edit the List of URL Categories (Optional) CHAPTER 2 Reports 1-17 2-1 Overview of Reports Accessing Reports Data Formats 2-1 2-1 2-2 Time Ranges 2-2 Timing of Data Availability 2-2 Export 2-3 Exporting to a .
CH A P T E R 1 Installation and Setup • Introduction, page 1-1 • System Requirements and Sizing & Scaling Recommendations, page 1-3 • Set-up Overview, page 1-3 • Upgrade the Advanced Web Security Reporting Application, page 1-3 • Install and Configure the Advanced Web Security Reporting Application, page 1-4 • Licensing and Migration, page 1-7 • Create the Folder Structure for Access and Traffic Monitor Log Files, page 1-9 • Import and Index Historical Data, page 1-9 • Set Up On-going Dat
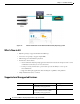
Chapter 1 Installation and Setup Introduction Figure 1-1 General architecture of the Advanced Web Security Reporting system. What’s New in 4.0 • Hybrid reporting to support both WSA and CWS logs. • Conversion of reporting to support simple XML. • Official support for distributed deployment. • Performance enhancements: – Advanced Web Security Reporting application indexes the data stream and parses it into a series of individual events that you can view and search.
Chapter 1 Installation and Setup System Requirements and Sizing & Scaling Recommendations Component Supported Not Supported Server Single-server deployments Multiple-server deployments Transport Methods FTP (files and directories) N/A TCP (syslogs) PDF Integrated PDF generation N/A Scheduled PDF Reporting (limited) System Requirements and Sizing & Scaling Recommendations System requirements, as well as sizing and scaling recommendations, are detailed in the Advanced Web Security Reporting Rel
Chapter 1 Installation and Setup Install and Configure the Advanced Web Security Reporting Application ls -la hot* Step 5 (verify no results) Stop the old version again: /opt/splunk/bin/splunk stop Step 6 Verify that the new version is not running: /opt/cisco_wsa_reporting/bin/splunk stop Step 7 Clean the indexes folders of the new version: cd /opt/cisco_wsa_reporting/var/lib/splunk rm -rf * Step 8 Copy indexes from old version to new version: cd /opt/cisco_wsa_reporting/var/lib/splunk cp -r /op
Chapter 1 Installation and Setup Install and Configure the Advanced Web Security Reporting Application On Linux These tasks must be performed in order: Step 1 Download the Single Installer for the Advanced Web Security Reporting 4.0 software: https://software.cisco.com/download/release.html?mdfid=283503844&flowid=39823&softwareid=283 998384&release=CiscoWSAReporting4.0&relind=AVAILABLE&rellifecycle=&reltype=latest Step 2 Extract the installer software.
Chapter 1 Installation and Setup Install and Configure the Advanced Web Security Reporting Application Step 1 Download the Single Installer for the Advanced Web Security Reporting 4.0 software: https://software.cisco.com/download/release.html?mdfid=283503844&flowid=39823&softwareid=283 998384&release=CiscoWSAReporting4.0&relind=AVAILABLE&rellifecycle=&reltype=latest Step 2 Unzip and extract the installer software. Step 3 Launch PowerShell or a Command Prompt window as Administrator.
Chapter 1 Installation and Setup Licensing and Migration • Document the local admin account password (regardless of the chosen authentication method). Commands To Start and Stop the Advanced Web Security Reporting Application On Linux To stop the Advanced Web Security Reporting application Change directory to /cisco_wsa_reporting/ and issue this command: ./shutdown.sh To start the Advanced Web Security Reporting application Change directory to /cisco_wsa_reporting/ and issue this command: /startup.
Chapter 1 Installation and Setup Licensing and Migration Migration from v3.0 WSA-only to v4.0 Hybrid Reporting As mentioned in the previous section, you can install the version 4.0 software and your previously installed license will continue to provide WSA reporting. In addition, the embedded evaluation license will let you evaluate the hybrid reporting feature.
Chapter 1 Installation and Setup Create the Folder Structure for Access and Traffic Monitor Log Files 5. Ensure that indexes are reported to the correct pool: a. Navigate to Settings > Licensing and find the “Pools Indexers Volume used today” row under the appropriate license stack. b. If necessary, you can click Edit to change the maximum daily volume allocation, and the indexers assigned. c. Click Cancel if you made no changes, or Submit if you made changes.
Chapter 1 Installation and Setup Import and Index Historical Data Step 1 Copy the historical log files into the folder structure for log files. Step 2 On the Advanced Web Security Reporting Web page, log in as admin. Step 3 Verify that data is being imported: Tip a. Select Settings > Indexes. b. Scroll down to the summary row. c. Verify that the Earliest event and Latest event columns display reasonable dates.
Chapter 1 Installation and Setup Set Up On-going Data Transfers Set Up On-going Data Transfers Before You Begin • Import and Index Historical Data, page 1-9 • Know the path to your log files: Create the Folder Structure for Access and Traffic Monitor Log Files, page 1-9. • Log into the Enterprise Web as admin. Configure Data Inputs for WSA Logs Note Step 1 To configure data input from multiple WSAs, repeat the following steps for each host.
Chapter 1 Installation and Setup Set Up On-going Data Transfers Step 5 Click Manual and then enter wsa_syslog in the Sourcetype field. Step 6 Choose Cisco WSA - Advanced Reporting as the App Context. Step 7 In the Host section, click Custom as the Method field, and then enter the Advanced Web Security Reporting host name as the Host field value. Step 8 Choose Default as the destination Index. Step 9 Click Review and review the values you provided. Step 10 Click Submit.
Chapter 1 Installation and Setup Configure CWS Log Updates Setting Log Type Value (Optional) Custom Fields Access only %XK (Adds a web reputation threat reason.) Retrieval Method Either Hostname: IP address or host name of the Advanced Web Security Reporting host. Select Syslog Push Protocol: TCP. Facility: choose auth. Note Note If connection between Advanced Web Security Reporting and WSA is lost, logs for that period are not available until connection is restored.
Chapter 1 Installation and Setup Set Up Department Membership Query (Optional) Set Up Department Membership Query (Optional) Perform the set-up procedure for department membership requirements under these conditions: • You will use AD/LDAP groups bound to roles in the Advanced Web Security Reporting application. • You will run reports on data that are based on organizational roles.
Chapter 1 Installation and Setup Set Up Department Membership Query (Optional) Note On Windows, if the departments.csv file is not populated with data at this point, change directory to \etc\apps\cisco_wsa_reporting\bin, and run cscript discovery.vbs, where is C:\Program Files\Cisco\CiscoWSAReporting. The membership script is set to run every day by default. The interval is set in seconds and can be changed as per the deployment requirements.
Chapter 1 Installation and Setup Set Up Scheduled PDF Reporting (Optional) Set Up Scheduled PDF Reporting (Optional) Advanced Web Security Reporting users can schedule PDF output generation from any dashboard, view, search or report.
Chapter 1 Installation and Setup Edit the List of URL Categories (Optional) Step 3 On that Search page, click Save As and choose Dashboard Panel. Step 4 Provide the appropriate Save As Dashboard Panel options: a. Dashboard – Click New or Existing: Select New when creating a new custom dashboard. Provide the following: • Dashboard Title (Optional) – Enter a name for the new dashboard. • Dashboard ID – Provide a file name for saving the dashboard; cannot be changed later.
Chapter 1 Edit the List of URL Categories (Optional) Cisco Advanced Web Security Reporting Installation, Setup, and User Guide 1-18 Installation and Setup
CH A P T E R 2 Reports • Overview of Reports, page 2-1 • Accessing Reports, page 2-1 • Data Formats, page 2-2 • Time Ranges, page 2-2 • Export, page 2-3 • General Versus Specific Data, page 2-3 • Predefined Reports, page 2-5 • Usage Scenarios, page 2-6 Overview of Reports Advanced Web Security Reporting includes a set of predefined reports. As much as possible the reporting is consistent with the native reporting of the Web Security Appliance.
Chapter 2 Reports Data Formats Step 3 Choose a report from the Other Dashboards menu. See General Reports, page 2-5 and Specific Reports, page 2-5. Step 4 Select a time range, data source and hosts, if applicable. Tip Improve performance by specifying smaller time ranges and crafting searches to be as precise as possible.
Chapter 2 Reports Export Export Exporting to a .CSV File This option can be useful for tracking reports. Step 1 Generate the report. Step 2 Select Export. Exporting to a PDF File Before You Begin • Verify that the Enterprise administrator has enabled PDF output. Step 1 Generate the report. Step 2 Select Save as PDF. General Versus Specific Data Predefined general reports provide hyperlinks to predefined specific reports.
Chapter 2 Reports Search Search Simple and advanced search options are available for most report pages. Search Tips • Make the searches as specific as possible, and narrow the time range. • Advanced Web Security Reporting uses a set of files to populate menus. If experience problems with the menus, verify that the necessary files are in the application’s look-ups folder, including: – malware_categories.csv – transaction_types.csv – url_categories.
Chapter 2 Reports Predefined Reports Predefined Reports General Reports • Overview • Users • Websites • URL Categories • Application Visibility • Anti-Malware • Client Malware Risk • Web Reputation Filters • L4 Traffic Monitor (WSA reporting only) • SOCKS (WSA reporting only) Specific Reports • Malware Category • Malware Threat • Application • Application Type • Domain • URL Category • User • Reports by Location – Overview by Location – URL Categories by Location – Anti-
Chapter 2 Reports Usage Scenarios Usage Scenarios User Investigation This example demonstrates how a system administrator would investigate a particular user at a company. In this scenario, a manager has received a complaint that an employee is visiting inappropriate Web sites at work.
Chapter 2 Reports Usage Scenarios URLs Visited In this scenario, a Sales manager wants to discover the top five visited Web sites at their company for the last week. Additionally, the manager wants to know which users are going to those Websites. Viewing Most Visited Web Sites Step 1 Select Web Sites from the Cisco Advanced Web Security Reporting drop-down menu. Step 2 Select Week from the Time Range drop-down list. Step 3 View the top 25 domains in the Domains Matched table.
Chapter 2 Usage Scenarios Cisco Advanced Web Security Reporting Installation, Setup, and User Guide 2-8 Reports
CH A P T E R 3 Field Extractions • Access Logs , page 3-1 • Traffic Monitor Logs, page 3-2 • AMP Logs, page 3-2 Access Logs Tip • Ensure timestamps are correctly being indexed. • Search for “*” and ensure app-specific fields are populated in the field picker. The next bullet item contains a more thorough examination of extracted fields. • Copy and paste the below search. You should not see any results and especially not very many results. If 1000 results are returned – the transforms.
Chapter 3 Field Extractions Traffic Monitor Logs • Verify the host extractions are correct. This is part of the inputs strategy discussed in the installation guide. The folder structure should be appropriately established to allow proper host extractions to occur. • Hosts may be renamed per the section of this guide that discusses the host look-up file Traffic Monitor Logs The L4TM reports are generated from L4TM data (not summary data).