
Release Notes

6
Release Notes for Cisco CDA Visual Quality Experience Application Release 3.10
Limitations and Restrictions
Performing a Date and Time Change with the Linux date Command
When performing a time/date change with the Linux date command only, perform the following
commands:
Step 1 Log in as root.
Step 2 Stop the VQE-S services by issuing the following command:
[root@system]# service vqes stop
Step 3 If needed, set the time zone with the vqe_cfgtool command’s -config option. Use the Configuration
Tool’s System Parameters menu and the Timezone choice.
Step 4 Set the system date and time by issuing the following command:
date -s “d
ate_time_string”
For example:
[root@system]# date -s “16:55:30 July 7, 2008"
Step 5 Synchronize the hardware clock by issuing the following command:
[root@system]# /sbin/hwclock --systohc
Step 6 Reboot the VQE-S server by issuing the following command:
[root@system]# init 6
Performing Login message change
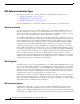
There are 3 files to enable login messages. The use of these files and the time when their contents are
displayed is given below.
Files Description
/etc/issue.net Content in this file is shown to users who connect
from
the network, before a login screen.
/etc/issue Content in this file is presented to local users, and
to n
etwork users if issue.net isn't present.
/etc/motd Content in this file is printed after a successful
l
ogin, but before a prompt is shown.
During installation, these files are put with common place holder message shown below.
Step 1 Login as root
Step 2 Open the required file in the preferred text editor
Step 3 Add the required login messages
Step 4 Save the file
For login messages during SSH, please add the steps below