
Quick Setup Guide


CHAPTER
5-1
Cisco Unified Communications Express Historical Reporting Client Configuration Guide
OL-14986-01
5
Generating Historical Reports
To generate a report using the Cisco Unified Communications Express (Cisco UCE) Historical
Reporting Client, follow these steps:
1. Choose General Report Settings, including the name of the report, whether to include charts, and
the date and time range for which you want information.
2. Choose Detailed Report Settings, including a sort method and a filter parameter.
3. Use the Report Viewer to view, print, or save (export) the report.
Generating reports with the Cisco UCE Historical Reporting Client is explained in the following
sections:
• General Report Settings, page 5-1
• Detailed Report Settings, page 5-2
• Saving and Loading Report Settings, page 5-4
• Report Viewer, page 5-6
General Report Settings
The general report settings are shown in the General Tab of the main window, beneath the text that reads,
“Select the options for historical reports below.” Table 5-1 lists the available general report settings.
You can return report settings to their default values at any time by clicking Reset in the Cisco UCE
Historical Reports main window. This action resets both general report settings and detailed report
settings.
To choose the report that you want to generate, follow these steps:
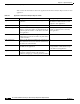
Table 5-1 General Report Settings: Descriptions
Setting Description
Report Type Name of the report to generate.
Include charts in
report
Radio button to indicate that charts are included with the report. Each
historical report contains one or more charts that display specific
information in the report.
Time Range Start/End date and time that specifies a period to use for the data in this
report.