
Maintenance Manual


Recordings
Archive Workflows
152
Creating an Archive Workflow
Use this task to create a new archive workflow.
TASK
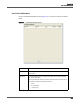
1. In the navigation tree, select Recordings > Archive > Workflows.
S
TEP RESULT: The Archive Workflow Administration window appears.
2. Next to the Archive Workflows section, click New.
S
TEP RESULT: The Archive Workflow Name dialog box appears.
3. Enter a name for the new archive workflow, and then click OK.
S
TEP RESULT: The workflow now appears in the Archive Workflows section.
4. Select the archive workflow in the Archive Workflows section.
5. In the Archive Upload section, enter the time for the end of the work day in 24-hour
format.
6. If you want recordings to be uploads as soon as a call is completed, select the
Immediate Recording Upload check box in the Archive Upload section.
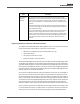
7. Set the length of time you want to retain recordings marked by agents.
– Tagged—recordings that have been marked by an agent for retention.
– Archive—all other recordings.
8. Assign teams to the archive workflow.
A
DDITIONAL INFORMATION: A team can belong to only one archive workflow at a time.
If a team you want to assign to this archive workflow is already assigned to another
archive workflow, it is automatically reassigned to this archive workflow. A warning
message is displayed telling you that the team is being reassigned from another
archive workflow.
9. When you are done configuring the archive workflow in this window, click Save.