
Technical References

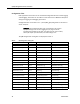


Quality Management Service Information
20 October 2007
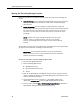
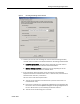
■ The user must have read/write access to both the external drive location
entered AND the location where QM is installed on the local server.
8. Click OK.
9. Copy the recording files from the audio folder and all subfolders (for voice
recordings) or from the video folder and all subfolders (for screen recordings)
at the old location (default location is C:\Program Files\Common Files\
QM\recordings\) to the new location. The new location must have the audio
or video folder and all its subfolders. For example:
Copy: …old location\audio\
…old location\video\
To: …new location\audio\
…new location\video\
10. Rename the old location audio folder and/or video folder for backup
purposes.
After you have verified that the files in the new location can be accessed (see
the procedures below) and the move was successful, this folder can be
deleted.
To verify that the moved recordings can be played back:
1. Restart the QM DB Proxy Service and the Tomcat service.
2. Start QM Desktop and play back at least one QM recording (if applicable) and
one archive recording (if applicable).
3. If the playbacks are successful, restart the QM Upload Controller.
To verify that new recordings are uploaded to the new location:
1. With archiving enabled, make a test call from a phone that is configured to be
recorded.
2. In QM Desktop, download that call on demand on the Archive tab and play it.
You will be able to do this if the call is uploaded to the correct location.
NOTE: If you do not enable archiving, you must wait for the normal
uploading cycle to occur before you can review the call on the
Recording tab.