
Installation Guide


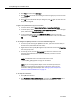


Table Of Contents
- Overview
- Installing QM
- Introduction
- Prerequisites
- Installing QM Services
- QM Configuration Setup
- Setting Up NT Authentication for the Cisco Unified CC Database
- Setting Up Named Pipes for the Cisco Unified CC Database
- Installing QM Desktop Applications
- Using Automated Package Distribution Tools
- Removing QM
- Index

Quality Management Installation Guide
42 June 2007
■ Change the information through the Site Configuration node in QM
Administrator.
■ Start QM Configuration Setup from the executable PostInstall.exe, located on
each server in C:\Program Files\Cisco\WFO_QM\bin.
When QM Configuration Setup is started, it runs in Update Mode.
To change configuration setup data in Update Mode:
1. Start QM Configuration Setup.
2. Select the window you want to modify from the left pane, enter the new data
in the right pane, and then click Save on the toolbar or File > Save from the
menu bar.
■ You can display the windows in any order you wish.
■ If you modify something in a window, you must click Save to save your
changes before you move on to another window.
■ If you make a change to a window but need to change back to the original
setting, click the Revert to Saved button on the toolbar. This discards any
changes you made but haven’t saved yet, and reverts the window back to
the last saved version.
3. When you are done making your changes, choose File > Exit or click Close.
QM Configuration Setup closes.
4. Stop and restart the modified service and all desktops for the change to go
into effect.
QM Configuration Setup Tools
There are a number of tools available to run when you update site information with QM
Configuration Setup. These tools are available through the Tools menu (see
Figure
18). These tools normally run during the initial installation of QM.