
Installation Guide


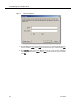


Table Of Contents
- Overview
- Installing QM
- Introduction
- Prerequisites
- Installing QM Services
- QM Configuration Setup
- Setting Up NT Authentication for the Cisco Unified CC Database
- Setting Up Named Pipes for the Cisco Unified CC Database
- Installing QM Desktop Applications
- Using Automated Package Distribution Tools
- Removing QM
- Index

Quality Management Installation Guide
28 June 2007
Figure 7. Change QM Administrator Password dialog box.
3. By default, there is no password. Enter your new password in the New
password field, enter it again in the Confirm new password field, and then
click OK.
The password must be between 1 and 32 alphanumeric characters long. It is
case sensitive.
The Active Directory Options dialog box appears (see Figure 8).
Figure 8. Active Directory Options dialog box.
4. If your system uses Active Directory, choose Use Active Directory. If your
system does not use Active Directory, choose Use QM Authentication.
The QM Configuration Setup utility appears.
5. Complete the fields in each window. Use the Next button to move forward to
the next window.
■ You cannot move forward until all required information is entered.
■ You cannot skip a window.