
Installation Guide


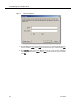


Table Of Contents
- Overview
- Installing QM
- Introduction
- Prerequisites
- Installing QM Services
- QM Configuration Setup
- Setting Up NT Authentication for the Cisco Unified CC Database
- Setting Up Named Pipes for the Cisco Unified CC Database
- Installing QM Desktop Applications
- Using Automated Package Distribution Tools
- Removing QM
- Index

Installing QM Services
June 2007 25
Installing QM Services
Install the QM services according to the supported system configuration illustrated in
Figure 1 on page 13.
QM Configuration Setup runs automatically after you have installed a service or group
of services.
IMPORTANT! Any time QM Configuration Setup starts after an
installation or an upgrade, it must be run to completion in order for
the system to function.
To install a QM service or service group:
1. Load the installation CD in the server computer, and then navigate to the CD
in My Computer or Windows Explorer.
2. Double-click the file setupWlogs.bat to start the installation wizard. The
Custom Setup dialog box is displayed.
Figure 5. Custom Setup window.
3. Select the service or group of services you want to install on this computer.
Click the icon next to the services name to display a menu and select This
feature will be installed on local hard drive.
You can change the location where the services will be installed by clicking
Change and entering a new path.