
Installation Guide


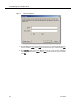


Table Of Contents
- Overview
- Installing QM
- Introduction
- Prerequisites
- Installing QM Services
- QM Configuration Setup
- Setting Up NT Authentication for the Cisco Unified CC Database
- Setting Up Named Pipes for the Cisco Unified CC Database
- Installing QM Desktop Applications
- Using Automated Package Distribution Tools
- Removing QM
- Index

Quality Management Installation Guide
22 June 2007
Prerequisites
Before you install the QM services:
■ Install Microsoft SQL Server 2005 on the server where the QM Database
service will be installed.
■ Configure the port exceptions in the Windows firewall (if the firewall is turned
on) for the Microsoft SQL Server.
Install Microsoft SQL Server 2005
Install Microsoft SQL Server 2005 and the following components as per the SQL
Server documentation:
■ SQL Server Database Services
■ Workstation components, Books Online, and development tools
Once the Microsoft SQL Server 2005 and the components are installed, create a
Login User and assign a username and password.
NOTE: You will need the DBinstance name, username and password
created here to complete the QM Database window in QM
Configuration Setup, which runs automatically after you install the
QM services.
NOTE: SQL Server must be set up with case-insensitivity (SQL
collation name SQL_Latin1_General_Cp1_CI_AS: see
http://msdn2.microsoft.com/en-us/library/aa258233(SQL.80).aspx
for more information.
To create a SQL Login User:
1. On the SQL Server computer, start SQL Server Management Studio.
2. From the navigation tree in the left pane, select Security > Logins under the
SQL instance.
3. Right-click Logins and select New Login from the popup menu to display the
New Login dialog box.
4. On the General page, enter a name for the new login, select SQL Server
Authentication, enter a password, and clear the Enforce password policy
check box.
5. On the Server Roles page, select dbcreator from the list of server roles.
6. Click OK.
The new login user is added to the list in the right pane.