
Release Notes


Release Notes for Cisco Workforce Management 8.2(2)
Documentation Updates
Note Specify the same start and end dates for the reference period you used when you created the distribution
scenario.
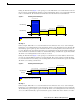
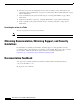
Step 8 To adjust average handling time, click Additional Parameters to display more parameters (Figure 8) and
select one of the following options:
• Distribution Call Handling Times — If you changed the email handling time when you created the
distribution, WFM uses the modified email handling time when generating the forecast. See
“Creating a Call Distribution” on page 138 of the Administrator User Guide for more information.
• Standard Handle Times — WFM uses the email handling times specified when you created the CSQ.
See “Creating a CSQ” on page 53 of the Administrator User Guide
for more information.
Step 9 Enter the ratio by which you want the forecast adjusted in the Adjustment Factor field. WFM applies this
adjustment independent of the trend calculation. If you do not want any special adjustment, set the
adjustment factor to 1.0.
Note Unless you are in a growth period and you already know this growth percentage, we recommend using
the default value (1.0) in this field and modify the Adjustment Factor field that appears in the Forecast
Maintenance pane where you can better analyze the data (see “Editing Forecasts” on page 163 of the
Administrator User Guide).
Step 10 Enter the date using the MM-DD-YYYY format (for example, 01-28-2008) and time using the HH:MM
format (for example, 08:30) when you want to generate this forecast in the Execute Request Date field.
When you select a date from the calendar, WFM automatically inserts the current time. The best practice
is to generate the forecast during off peak hours.
See “Call Handling Estimation Methods” on page 151 of the Administrator User Guide for
additional information.
Step 11 Click Service Levels Calculation to display more parameters (Figure 9) and complete the fields.
Figure 8 Additional Parameters