
User Guide


Evaluating a Contact
September 2009 59
Evaluating a Contact
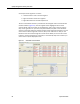
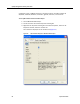
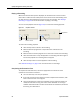
The first step an evaluator takes is to select and display a contact recording.
Recordings belonging to the group, team, agent, or knowledge worker (depending on
how you sort the navigation tree) are listed in the Contacts pane in alphabetical order.
When the navigation tree is first displayed, the folders are a dark gray. As you expand
the folders and display lists of contacts in the Recording View pane, the folders turn
yellow. This indicates that the contact metadata—information about each contact
such as the agent’s name, the time and date of the contact, and so on—is now cached
in your computer’s memory.
To select and display a contact recording:
1. In the navigation tree, click the drop-down list to select the way you wish the
contact recordings to be sorted.
2. Expand the resulting folders as necessary.
3. In the Contacts pane, double-click the contact recording you want to evaluate.
The contact opens in the Evaluation View pane.
NOTE: To ensure that the navigation tree displays all current contact
recordings, click the Refresh button at the bottom of the navigation
tree pane.
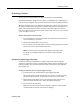
Evaluating an Agent-Tagged Recording
A contact that was recorded because an agent marked it for retention displays
“Tagged” in the Reason column on the Recordings window. These recordings do not
have an evaluation form associated with them until the first person who evaluates
them assigns one.
To assign an evaluation form to an agent-tagged recording:
1. In the Contacts pane, double-click the agent-tagged recording.
The contact opens in the Evaluation View pane. There is no evaluation form
associated with the contact, so the bottom portion of the pane is blank.
2. Directly below the playback pane is a drop-down list from which you can
select any active evaluation form. Select the desired active form.
3. Score and save the evaluation.
When you have scored and saved the evaluation, that form is permanently
associated with the contact and cannot be changed.