
Release Note


1-5
Cisco Unified CCX Historical Reports User Guide, Release 7.0(1)
Chapter 1 Overview
The Cisco Unified CCX Historical Reports Client Interface
Note If you try to start the Cisco Unified CCX Historical Reports client but you have
not been given access to it, you will see the User Privileges Missing dialog box.
In this case, your system administrator can click Yes and set up access for you. If
you click No, you will not have access to any reports. Your system administrator
can give you access later. See the
“Giving Users Access to Cisco Unified CCX
Historical Reports” section on page 2-8 for more information.
Caution If your Cisco Unified CCX historical reports client PC runs on the Microsoft
Windows 2000 Professional operation system (OS) or if your Cisco Unified CCX
server runs on the Window 2003 OS, then the security policies on your Cisco
Unified CCX Historical Reports client PC must match the policies on your Cisco
Unified CCX server. To verify this match on a Cisco Unified CCX server, choose
Start > Programs > Control Panel > Administrative Tools > Local Security
Policy and note the Network Security: LAN Manager Authentication setting under
Security Settings > Local Policies > Security Options. Next, go to the Local
Security Settings window on the Historical Reports client PC and verify that the
Security: LAN Manager Authentication setting under Security Settings > Local
Policies > Security Options is identical to the Cisco Unified CCX server.
Procedure
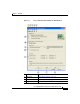
Step 1 Double-click the Cisco Historical Reports icon on your Windows desktop. Or,
choose Start > Programs > Cisco Unified CCX Historical Reports >
Cisco
Unified CCX Historical Reports.
The Login dialog box appears.
Note You must enable Secondary Logon service on your Cisco Unified CCX Historical
Reports client PC. To enable this service, choose Start > Settings > Control
Panel > Administrative Tools > Services, right-click the service and select
Start.
Step 2 Enter your user name and your password.