
Release Note


Chapter 4 Generating Historical Reports
The Report Viewer
4-20
Cisco Unified CCX Historical Reports User Guide, Release 7.0(1)
Procedure
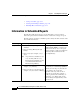
Step 1 Make sure that the mouse pointer has changed to a magnifying glass, and then
double-click the group name or its associated data.
The Group Information pane appears, displaying information for the group.
Step 2 To return to the chart, click the Preview tab.
Step 3 To close a Group Information pane when it is displayed, click the Close Current
View tool.
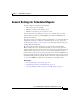
Printing Reports
You can print a report while viewing any part of the report. If you are viewing
information in a Group Information Pane, only that information prints. The report
prints on the default printer that has been designated for your computer.
To print a report, follow these steps:
Procedure
Step 1 In the Unified CCX Historical Reports main window, choose the report settings
that you want, and then click View.
The report appears in the Report Viewer window.
Step 2 Click the Print tool.
The Print dialog box appears.
Step 3 In the Print dialog box, choose the settings that you want.
Step 4 Click OK.
The Printing Records dialog box appears while the file is being printed and shows
the progress of printing.