
Installation Guide


Define the Member Node in the Administration Console
If you intend to add a Member node, you must define the Member in the Administration console
before you run the installation for the Member.
Step 1
To access the Administration console, direct a browser to the URL http://<HOST ADDRESS>/
oamp where HOST ADDRESS is the IP Address or Hostname of your server.
Step 2
Sign in using the system application user ID and password that you defined during installation.
Refer to your Configuration Worksheet (page 7).
Step 3
From the panel in the left, select the Device Management drawer. Then select Device
Configuration.
The Device Configuration page shows the Controller that you have installed. Note that the
hostname defaults to the alias CUIC1. (You can change it.)
Step 4
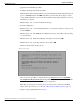
On the Device Configuration page, click Add Member.
Step 5
On the Device Configuration fields for the new Member, enter a name by which you can identify
the Member, the hostname or IP address, and a description for the device.
Step 6
Click Save.
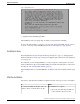
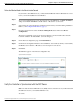
The Member appears on the Device Configuration list.
Figure 4: Member Configured
Verify the Controller is Synchronized with the NTP Server
Make sure that the Network Time Protocol (NTP) on the Controller node is synchronized with
the NTP server before you install the Member node.
To do this:
Installation and Upgrade Guide for Cisco Unified Intelligence Center Release 8.5(2)
30
Chapter 6: Sign in to the Administration Console
Verify the Controller is Synchronized with the NTP Server