
Installation Guide


Step 4
In the Security Configuration screen:
a.
Enter the Database Access Security password. This is the password that servers in the
cluster use to communicate with each another. You must enter the same security password
for all servers.
b.
Select OK to open the SMTP Host Configuration screen.
Step 5
In the SMTP Host Configuration screen, select whether you want to configure an SMTP host
to receive platform-level emails; for example, emails about certificate expiration. This field is
optional. You will configure email for report scheduling in the Administration console.
ThenIf
Select Yes to open the second SMTP screen
opens.
You want to configure an SMTP Host.
Proceed to Step 6.
Select No to open the Application User
Configuration screen.
You do not want to configure an SMTP Host.
Proceed to Step 7.
Step 6
In the second SMTP Host Configuration screen:
a.
Enter the hostname or IP address for the SMTP server.
b.
Select OK to open the Application User Configuration screen.
Step 7
Complete the Application User Configuration screen. The application user for the Controller
becomes the System Application User and the default Super User. See the FAQ on Accounts
and Passwords (page 53) for the permissions and responsibilities of the System Application
User.
Note: Although it is possible to enter unique Application User credentials on each installed
node, it is a best practice to enter the same Application User Name and password on all nodes.
The Application User credentials entered during the Controller installation are the only ones
recognized by Unified IC.
a.
Enter the application username.
b.
Enter and confirm the application user password.
c.
Select OK to open the Platform Configuration Confirmation screen. This screen states
that the platform configuration is complete.
Step 8
In the Platform Configuration Confirmation screen, select OK.
Step 9
The Installation (page 25) begins.
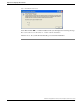
Note: If installing over a Virtual Machine, the system will display the following screen:
Installation and Upgrade Guide for Cisco Unified Intelligence Center Release 8.5(2)
22
Chapter 4: Configuring the Controller