
Installation Guide


Configuring the Controller
Completing the Configuration for the First Node
When you complete the basic install configuration and select Yes to indicate that you are
installing the first node, perform the following steps to complete the configuration for the
Controller.
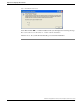
The first screen you see is the Network Time Protocol Client Configuration screen.
This screen gives the option of setting the time for the first node (the Controller) from a time
that you set on the Hardware Clock screen - or - from an external Network Time Protocol server
that you define.
NTP server configuration is mandatory for Unified IC installation over a Virtual Machine.
Note: Network Time Protocol configuration is set for the first node. Other nodes set their time
to the time on the first node.
Step 1
Select Yes at the Network Time Protocol Client Configuration screen.
The Network Time Protocol Client Configuration screen opens.
Step 2
Enter the IP address, NTP server name, or NTP Server Pool name for at least one external NTP
server.
You can add up to five NTP servers and make changes to the NTP server list at a later time.
Note: Cisco recommends that you use a minimum of three external NTP servers. If you install
the first node over MCS server, an option to skip NTP server configuration is available.
Step 3
When you complete the NTP configuration, select OK.
The Security Configuration screen opens.
Installation and Upgrade Guide for Cisco Unified Intelligence Center Release 8.5(2)
21
Chapter 4