
Installation Guide


Your selection of No opens the DHCP Configuration screen.
Step 5
In the DHCP Configuration screen, select No to open the Static Network Configuration screen.
Step 6
At the Static Network Configuration screen, enter static network configuration values as
follows, referring to the Configuration Worksheet (page 7) if necessary:
a.
Enter the Hostname.
b.
Enter the IP Address.
c.
Enter the IP Mask.
d.
Enter the GW Address,
e.
Select OK to open the Domain Name System (DNS) Client Configuration screen.
Step 7
Enter your DNS client information as follows, referring to the Configuration Worksheet (page
7) if necessary:
a.
Enter the Primary DNS (mandatory).
b.
Enter the Secondary DNS (optional).
c.
Enter the Domain (mandatory).
d.
Select OK to open the Administrator Login Configuration screen.
Step 8
In the Administrator Login Configuration screen:
a.
Enter the ID for the System Administrator. See the FAQ on Accounts and Passwords (page
53) for the permissions and responsibilities of this administrator.
b.
Enter and then confirm the password for the administrator.
c.
Select OK to open the Certificate Information screen.
Step 9
In the Certificate Information screen:
a.
Enter data to create your Certificate Signing Request—Organization, Unit, Location, State,
and Country.
b.
Select OK to open the First Node Configuration screen. ("Is this the First Node in the
cluster?")
Step 10
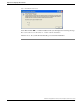
In the First Node Configuration screen, specify whether you are configuring the first node
(the Controller).
ThenIf
Select Yes to open the Network Time Protocol Client
Configuration screen.
You are installing and configuring
the primary node (the Controller).
Installation and Upgrade Guide for Cisco Unified Intelligence Center Release 8.5(2)
18
Chapter 3: Beginning the Installation - All Nodes