
Maintenance Manual


Entry Points 87
6. Before adding the code to your website, ensure that you replace the server name in the value of the
egainChat.liveServerURL
property with the fully qualified domain name of the web server. If you are
using load balancer, it should be the name of the load balancer server.
7. Locate
var eGainChatUrl
and check the value of the property to see if you need to replace the template
name, language code, and country codes with custom templates or custom languages.
8. To enable auto-login for an entry point, you need to modify the entry point code so that the customer
information collected at the time of login on the website is passed on to the Unified EIM & WIM application
when the customer initiates a chat session. Also, enable the auto-login feature for the template.
In the link, you need to add the customer details, which are provided by the customer.
For example, if the entry point is mapped to a template set which has Name, email ID, and phone number as
the login page fields, the following parameters should be added to the URL:
&fieldname_1=<value1>&fieldname_2=<value2>&fieldname_3=<value3>
. Make sure that the
values of the parameters are encoded in ASCII encoding. If the installation is an upgraded system and you
are using the Unified EIM and WIM 4.4 templates, then ensure that the parameters values are encoded using
the UTF-8 encoding.
Locate the following lines in the code:
var eGainChatUrl =
egainChat.liveServerURL+'templates/chat/sunburst/chat.html?subActivity=Chat&ent
ryPointId=1000&templateName=sunburst
&languageCode=en&countryCode=US&ver=v11&eglvrefname='+refererName+'&'+eglvcasei
d+vhtIds;
Modify the URL to look like:
var eGainChatUrl =
egainChat.liveServerURL+'templates/chat/sunburst/chat.html?subActivity=Chat&ent
ryPointId=1000&templateName=sunburst
&languageCode=en&countryCode=US&ver=v11&eglvrefname='+refererName+'&'+
eglvcaseid+”&fieldname_1=”+
Name
+”&fieldname_2=”+
EmailID
+”&fieldname_3=”+
Phonenumb
er
+vhtIds;
where Name, EmailID, Phone-number are the customer details collected at the time of login to the website.
9. Open the code view of the host web page and add the link code at the appropriate point. You may need to
ask your webmaster to perform this task.
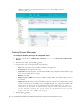
10. You can also choose to show or hide the chat link based on agent availability. Provide the following Web
Service URL to your web master to add to the website code:
http://<
Web Server
Name
/
Context_Root_Name
/egain/chat/entrypoint/agentAvailability/
Entry_Point_ID
Where,
Web Server Name is the name of a web server in the deployment. If you are using load balancer, it should be
the name of the load balancer server.
Context_Root_Name is the context root name defined for the application.
Important: This setting is only applicable for standalone chats.