
Maintenance Manual


86 Cisco Unified Web and E-Mail Interaction Manager Administrator’s Guide to Chat and Collaboration Resources
The UI does not display the custom chat templates or languages added for chat. Before you begin this task, get
the list of template names and language files names that you have created on the web server:
Cisco_Home
\eService\templates\chat and
Cisco_Home
\eService\templates\callback
.
To add a chat and collaboration help link to a website:
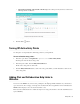
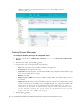
1. In the Tree pane, browse to Administration > Departments > Department Name > Chat > Entry Points.
2. In the List pane, select an entry point.
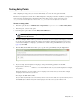
3. In the Properties pane toolbar, click the Show HTML button.
4. The Select Template Folder window opens. From the window, select the templates you want to use for the
entry point and select the Template Language from the dropdown list. Custom chat templates and languages
are not displayed here. Click OK.
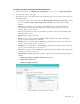
The Show HTML window appears. Here you can view the HTML code of the entry point.
Sample HTML code
5. Edit the following parameters of the entry point code:
a. Look for the parameter
var refererName
. By default, the parameter value is blank. Type in a name
that describes the page that the hyperlink will appear in. In the following example, the name of the page
is “Support.”
var refererName = "Support"
b. Edit the following line to change the text that appears in the hyperlink. By default, it is “Test”.
Substitute the word “Test” for wording which you deem appropriate, such as “Click here to chat with
one of our agents.”
<a href="#" onClick="openHelp()" style=cursor:hand>
Test
</a>
Important: You can only view or copy the HTML. It cannot be edited or deleted. If you are creating
a new entry point and want to view its HTML, you have to first save it to enable the Show HTML
button.