
Maintenance Manual


Entry Points 81
Testing Entry Points
After configuring an entry point, you can test it immediately to see how the entry point looks like.
The UI does not display the custom chat or callback templates or languages added for chat. Before you begin this
task, get the list of template names and language files names that you have created on the web server:
Cisco_Home
\eService\templates\chat and
Cisco_Home
\eService\templates\callback
.
To test an entry point:
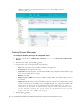
1. In the Tree pane, browse to Administration > Departments > Department Name > Chat > Entry Points.
2. In the List pane, select an entry point.
3. In the Properties pane toolbar, click the Entry Point URL button.
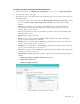
4. The Select Template Folder window opens. From the window, select the templates and language you want to
use for the entry point. This window only displays out-of-the-box templates and languages. If you have
created custom templates or languages, you will need to edit the entry point URL before you can test it
(page 87). Click OK.
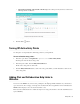
5. From the Entry Point URL window that opens, copy the entry point URL by using the Copy button.
Sample URL window
6. If you are using custom templates or languages, change the following parameters in the URL:
Replace both occurrences of
sunburst
or
rainbow
with the name of your custom template. For example,
PurpleNile.
Change the language code and country code in
languageCode=en&countryCode=US
. For example,
languageCode=it&countryCode=IT
.
The sample chat URL will look like:
http://demo1/pm/templates/chat/PurpleNile/chat.html?subActivity=Chat&entryPoint
Id=1000&templateName=PurpleNile&languageCode=it&countryCode=IT&ver=v11
Important: If you are creating a new entry point and want to test it, you have to save the entry
point to be able to test it.