
Maintenance Manual


68 Cisco Unified Web and E-Mail Interaction Manager Administrator’s Guide to Chat and Collaboration Resources
To add new fields:
1. Open the Cisco_Home
\eService\templates\callback\
Template_Folder
\eGainLiveConfig.js
file
in a text editor and do the following:
a. Locate the
loginParameters
property, and copy a section for one of the existing parameters and
paste it where you want to add the custom field. Edit the following properties.
paramName: Create a parameter name using the format
L10N_
Name
_PROMPT
.
objectName: Provide the object name. See the table on page 67 for details about the object name
you need to provide.
attributeName: Provide the attribute name. See the table on page 67 for details about the attribute
name you need to provide.
primaryKey: Set the value as
0
.
required: If you want to set the field as required set the value as
0
. To make the field mandatory,
set the value
1
.
minLength: Set the minimum required characters for the field. If a field is not required, set the
minimum length as 0.
maxLength: Set the maximum allowed characters for the field. The value should not be set more
than the value set in the Tools Console while creating the custom attribute.
fieldType: Set the field type.
● For single line text fields, set the value as 1.
● For multi-line text fields, set the value as 2.
● For dropdown fields, set the value as 3.
● For multi-select dropdown list, set the value as 4.
validationString: Provide the expression against which the information provided by the customer
is to be checked. For example, for phone number you can give an expression like,
^\s*\(?\s*\d{3}\s*\)?\s*[-.]?\s*\d{3}\s*[-.]?\s*\d{4}\s*$
. And, for email you
can use the expression like,
^[0-9a-zA-Z\.\-\_]+\@[0-9a-zA-Z\.\-]+$
- this expression
refers to the format X@Y. Z (john@mycompany.com). For fields that require an integer value, you
need to atleast set the validation string as
\\d+$
.
className: Provide the
css
class you want to use for the field. These are defined in the
callback.css
file available in the
css
folder. You can use an existing class or create a new one.
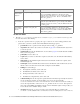
Subject, Custom
attributes added to
activity data
casemgmt::activity_data subject
If the custom attributes added to the object has two words,
replace the space with underscore (_). For example, if the attribute
created in Tools Console is
More details
, the attribute name
will be
more_details
.
Custom attributes
added to customer
data
casemgmt::customer_data If the custom attributes added to the object has two words,
replace the space with underscore (_). For example, if the attribute
created in Tools Console is
Family name
, the attribute name will
be
family_name
.
Custom attributes
added to contact
point data
casemgmt::contact_point_data If the custom attributes added to the object has two words,
replace the space with underscore (_). For example, if the attribute
created in Tools Console is
Mobile number
, the attribute name
will be
mobile_number
.
For Object Name Attribute Name